Do you feel annoyed when your Apple Music song ends abruptly? With recent updates, there is a feature in Apple Music called crossfade through which you can shift playing to another song with a smooth transition. This functions by fading out the ending of the previous song and fading in the next song to produce a perfect transition.
This smooth transition lets you feel a non-interruptive listening experience. Moreover, you can enjoy listening to your Apple playlist in a comfortable environment without pauses between songs. If you are unable to use the Apple Music crossfade feature, this article will help you. We will devise ultimate methods that can help you use and enable the crossfade feature on your devices easily.
- Part 1. How to Use Apple Music Crossfade on iPhone
- Part 2. How to Crossfade Between Apple Music Songs on Old Versions of iOS
- Part 3. How to Crossfade Songs on Apple Music on Mac
- Part 4. How to Get Apple Music Crossfade on Android
- Part 5. How to Turn on Crossfade on Apple Music on Windows
- Part 6. FAQs about Apple Music Crossfade Songs
- Part 7. In Conclusion
Part 1. How to Use Apple Music Crossfade on iPhone
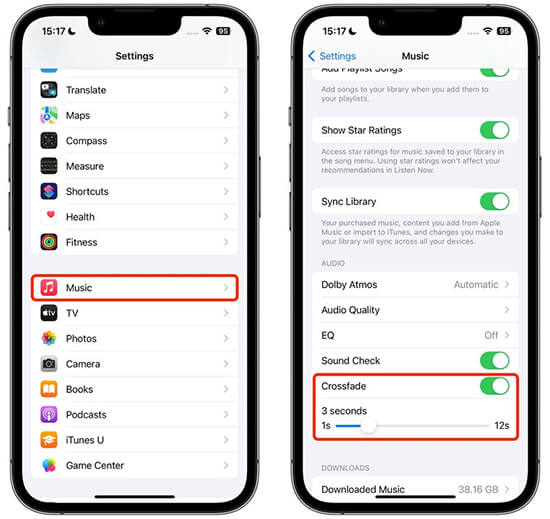
The Apple Music crossfade has been recently released in iOS 17 for iPhone users. In this section, we will provide you with detailed steps to enable crossfade Apple Music iPhone properly.
Step 1. On your iPhone, go to “Settings” and scroll to the bottom until you find Apple Music.
Step 2. Select Apple Music which will open the related options on the screen.
Step 3. On iOS 17, you can find the option of “Crossfade” on your screen.
Step 4. Enable its toggle and set the timings for this feature according to your choice.
Part 2. How to Crossfade Between Apple Music Songs on Old Versions of iOS
If you don’t have iOS 17 on your iPhone, you can’t fade songs on Apple Music iPhone. However, you can use a third-party tool like AudKit Apple Music Converter to download Apple Music songs for crossfading on other mobile players. Through the AudKit tool, you can efficiently download and save unprotected Apple Music songs on your computer as local audio files.
This tool uses advanced algorithms that allow users to download the selected audio files in their original quality without distortion. Furthermore, it gives several benefits to its dedicated users. For example, you can download ID3 tags and complete information regarding the song. It also supports many audio file formats like MP3, FLAC, M4B, etc., to convert Apple Music songs.
The 30X faster speed generates quicker results as compared to other audio recorders. Also, it has a pleasant interface that beginners can operate without difficulty. AudKit prioritizes the security and privacy of its users. Therefore, while downloading Apple Music songs, you won’t face bugs, errors, ads, and malicious content. In a safe and reliable way, you can download unlimited songs from Apple Music in a compatible file format.

Main Features of AudKit Apple Music Converter
- Download and convert Apple Music to MP3, FLAC, WAV, etc. locally
- Remove protection from Apple Music, iTunes, and Audible
- Save Apple Music with the original quality and ID3 tags
- Crossfade songs on Apple Music anywhere
How to Download Apple Music for Crossfading Anywhere
Here are the easy instructions that you can check to download Apple Music songs through the AudKit software for crossfading songs with ease.
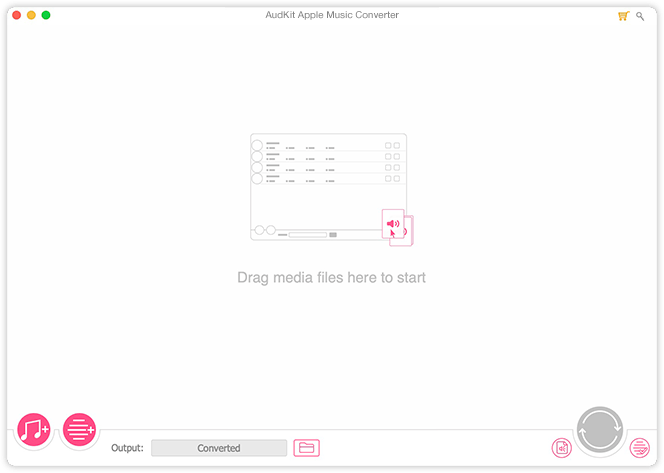
Step 1 Add Apple Music to AudKit Apple Music Converter
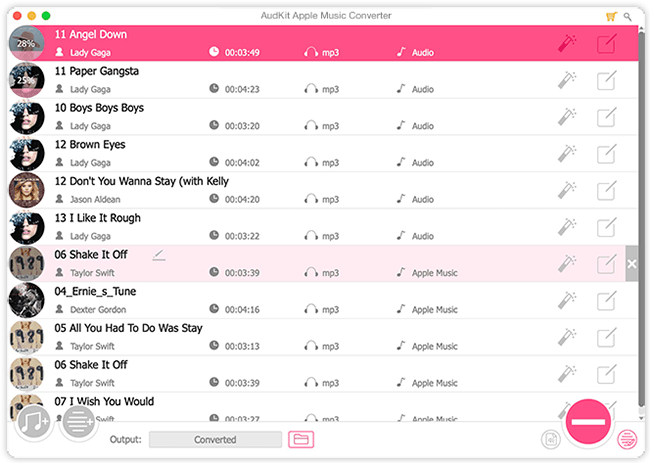
First, you have to install and download AudKit Apple Music Converter on your PC/Mac. Now, open the interface of the AudKit Apple Music Converter and click the “Add” button on the bottom left corner to import Apple Music songs. You can also directly drag and drop the target Apple tracks into the main interface of the tool.
Step 2 Specify Apple Music Output Settings
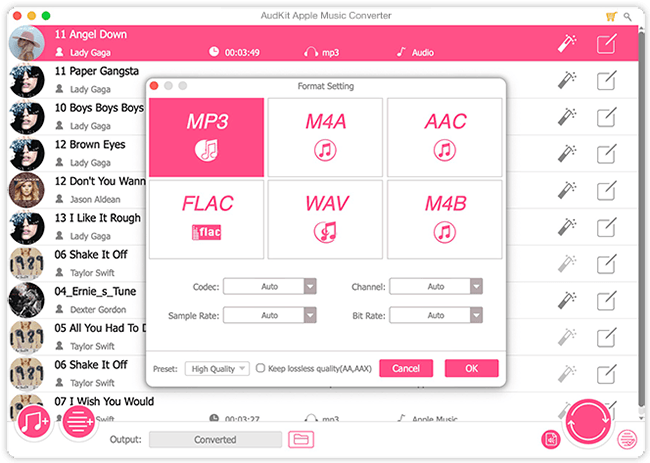
Click the “Format” icon at the bottom right corner of the main interface to change the output settings. In the settings window, you can specify the output format, sample rate, bit rate, etc. of Apple Music to improve the output quality of the songs.
Step 3 Convert and Download Apple Music Files
You can also use the “Edit” button to change the speed and pitch of the song. After finishing, select the “Convert” button to start downloading. After that, the downloaded Apple Music files will be stored in your local folder. You can also select the “Converted” folder to locate your downloaded Apple Music files.
Step 4 Import Apple Music files to iOS device
Now, transfer the Apple Music files to the iPhone using a data transfer tool or iTunes/Finder. Then you can easily fade Apple songs with a suitable player regardless of your device. Also, the Spotify app will detect the local files if you have enabled the “Local Files” option. Afterward, go to the settings of Spotify and access the “Playback” settings to customize the crossfade option.
Part 3. How to Crossfade Songs on Apple Music on Mac
Are you a Mac user and want to fade Apple Music songs? In this part of the article, you can find simple steps to use it on a MacBook.
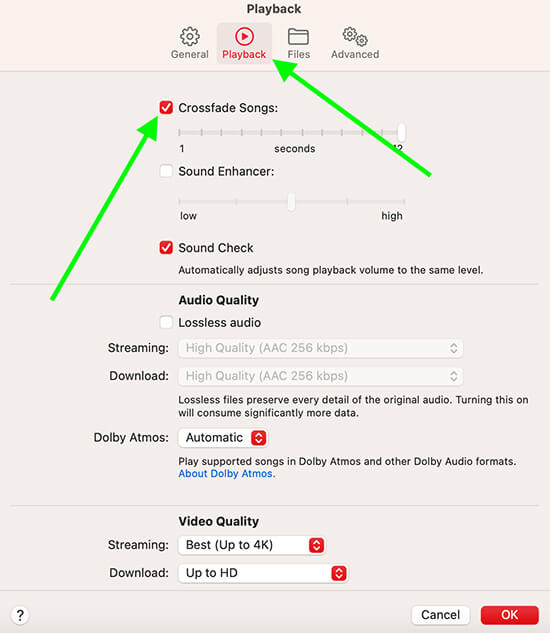
Step 1. Launch Apple Music on your MacBook and click “Music” in the menu bar at the top of the screen.
Step 2. From there, tap “Preferences” in the drop-down menu and click on “Playback“.
Step 3. Now, tick the “Crossfade Songs” box to enable this feature.
Step 4. Use the slider next to “Seconds” to adjust the length of the crossfade. You can choose between 1 and 12 seconds.
Step 5. Close the Preferences window. Now, when you play songs in Apple Music on your Mac, they will fade into each other according to the length of time you specified.
Part 4. How to Get Apple Music Crossfade on Android
The steps required to get the Apple Music crossfade on Android are quite easy to follow. Thus, proceed to the following to activate the change crossfade on Apple Music Android.
Step 1. On your Android device, go to Apple Music.
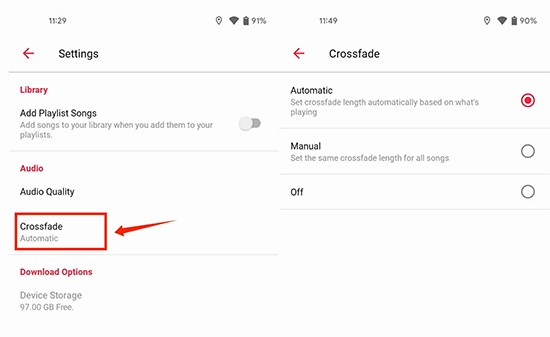
Step 2. From the top-right corner, select the “Three-Dot” icon and tap “Settings“.
Step 3. Then choose “Audio” and proceed to the “Crossfade” option.
Step 4. Afterward, enable the “Automatic” option.
Step 5. To change the transition timing, go to the “Manual” option.
Part 5. How to Turn on Crossfade on Apple Music on Windows
To enable the Apple Music automatic crossfade option on Windows, you would need assistance from the iTunes program. Hence, check the following simplified steps as described below.
Step 1. To begin with, locate and open iTunes from your PC.
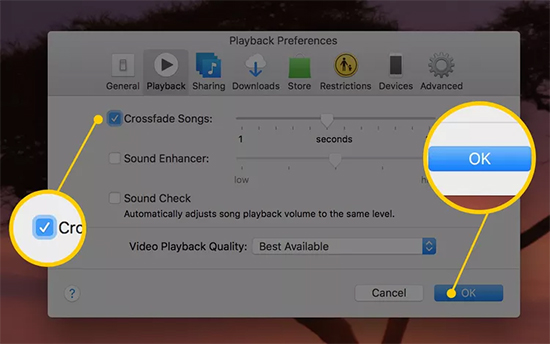
Step 2. Following this, access the “Edit” tab in the menu bar at the top of the screen and then choose the “Preferences” option.
Step 3. Now, proceed to the “Playback” option at the top of the Preferences window.
Step 4. Enable the “Crossfade Songs” option. Afterward, you can manage the slider to specify the time of transition.
Part 6. FAQs about Apple Music Crossfade Songs
Q1. Does Apple Music Have a Crossfade on iPad?
A: Yes, Apple Music on the iPad has a crossfade feature to fade out the end of one song while fading in the beginning of the next.
Q2. Why Is Apple Music Crossfade Not Working?
A: If you haven’t enabled this feature on your device, it won’t work for you. To solve this issue, you can go to settings and activate the crossfade option. Moreover, if the duration of the transition is set to 0, the crossfade feature won’t apply. Thus, adjust the slider for the timing of the transition correctly.
Q3. Can You Fade between Apple Music Songs in the Same Albums?
A: If you are playing an album on Apple Music that has consecutive tracks, this feature will be turned off automatically. Thus, you won’t experience the fading in and out between the songs.
Part 7. In Conclusion
Do you want to fill the pauses between songs? The Apple Musiccrossfade feature can smoothly add transitions between your songs to enhance your listening experience. To learn how to crossfade songs on Apple Music, this article will surely help you. You can check the provided multiple methods to enable the crossfade feature on various devices.

