
Apple Music supports Lossless Audio and you can as well add your local files to your library. Due to the region of using Apple Music, some users will find that some songs are missing so they decide to add those tracks to the Apple Music Library themselves. And adding local files is the most indispensable part.
You might already be wondering how to bring your fav-hits on board Apple Music from your numerous devices. Well, there is no need to leave your home recordings as stipulated in this article. We’ll tackle how to add local files to Apple Music from any operating system as labeled below.
- Part 1. Can You Add Local Files to Apple Music on Android
- Part 2. How to Add Local Files to Apple Music on iPhone/iPad
- Part 3. How to Add Local Files to Apple Music on Mac
- Part 4. How to Add Local Files to Apple Music on Windows
- Part 5. Fix: Apple Music Local Files Not Syncing
- Part 6. How to Apple Music to Local Files in MP3
- Part 7. In Conclusion
Part 1. Can You Add Local Files to Apple Music on Android
No. Android users can’t put local files on Apple Music directly even though they are subscribers since Apple Music is primarily designed for Apple’s own ecosystem, including iPhones and iPads. At the same time, any local file uploaded to Windows or Mac can’t be synced to Android devices
Part 2. How to Play Local Files on Apple Music iPhone/iPad
Once you’ve done with getting your local files into Apple Music on Mac or Windows, to let those songs show on your iPhone or iPad, the Syncing feature on your Music app should be enabled as well. Here’s how to turn on Sync Library to make sure to add local files to Apple Music iPhone/iPad.
📱Add Local Files to Apple Music on iPhone/iPad
From the Files App:
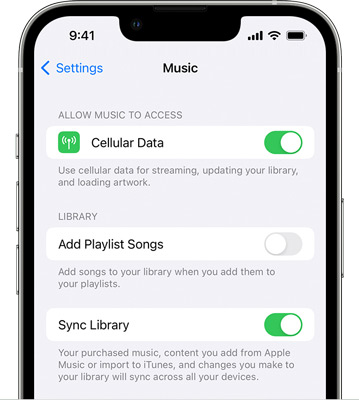
Step 1. On iOS devices, please go to “Settings” > “Music“.
Step 2. Then toggle the “Sync Library” option ON. The local files are now synced to your Apple Music library.
Step 3. Finally, find the recently added playlists in the library to play on your iPhone or iPad.
From Computer to iOS Devices:
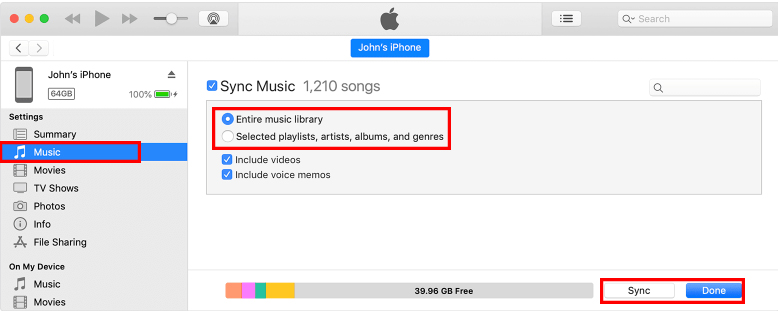
Step 1. Then connect your iPhone/iPad to your computer using a Lightning cable.
Step 2. Once connected, open the Finder app on Mac while launching the iTunes app on Windows.
Step 3. Select your iPhone or iPad from the device list on the left sidebar of Finder/iTunes.
Step 4. After opening the folder that contains the local files you want to add, drag and drop them to the device section directly.
📌Note: You can sync audio files between iOS devices and Mac/Windows from Finder/iTunes. Just click: “Music” > “Sync music to [device name ]” > “Entire music library” or “Selected artists, albums, genres, and playlists” > “Apply“/”Sync“.
⌚️Add Local Files to Apple Music on Apple Watch
Step 1. Fire up the Apple Watch app on your iOS device.
Step 2. Go to the “My Watch” section and click “Music“.
Step 3. Proceed to press “Add Music” below the “Playlists & Albums” tab.
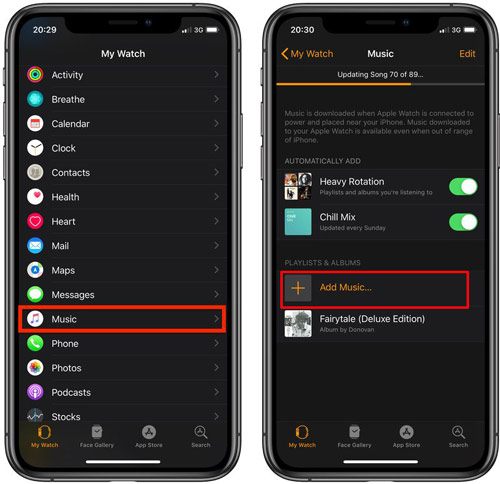
Step 4. From the pop-up, find the albums or playlists you prefer to sync. Then tap the Plus icon.
Part 3. How to Add Local Files to Apple Music on Mac
1.1 Put Local Files on Apple Music
The Music app is available for users running macOS Catalina and later versions. With this, you can store up to 100,000 songs for use. Here’s how to add local files to Apple Music on your Mac via the Music app.
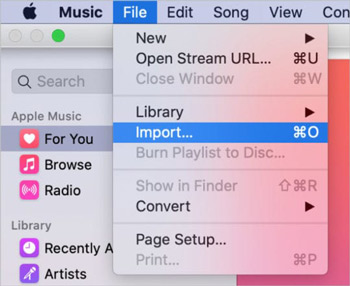
Step 1. First, open the “Music” app from your Mac device.
Step 2. Go to the “Menu” bar and tap the “File” > “Import” options.
Step 3. Check in the “Finder” pop-up to find the music you wish to add to Apple Music.
Step 4. Then, hit on the “Open” tab to add the selected files.
Step 5. Next, hit on the “File” > “Update Cloud Library” option to finally add the files to your Apple Music collection.
1.2 Turn on Sync Library on the Music App
After importing the audio files into the library on Mac, you need to turn on the “Sync Library” to access your music on other Apple devices.
Step 1. Open the Apple Music app on your Mac.
Step 2. From the “Menu” bar, choose your “Account” then ensure you have signed in with your Apple ID that you use with your Apple Music subscription.
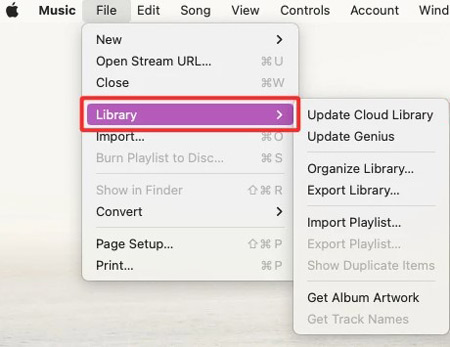
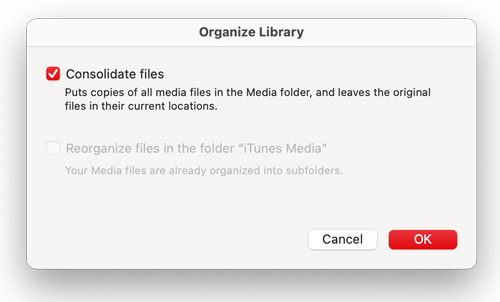
Step 3. Then, choose the “File” > “Library” > “Organize Library” option. Next, select the “Consolidate” files option.
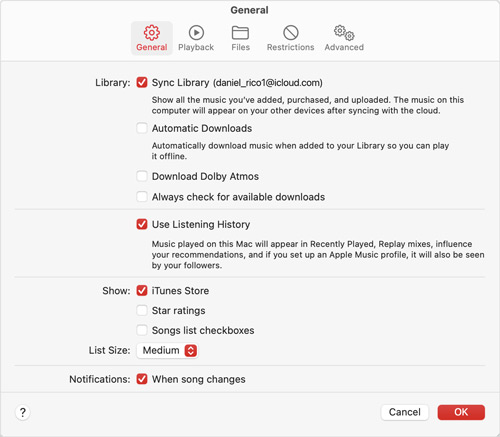
Step 4. Now choose “Music” > “Preferences” options.
Step 5. Click on the “General” tab option then select the “Sync Library” option.
Step 6. Hit on the “OK” option and wait for your music library to sync. Also, ensure you turn on Sync Library on your other devices.
Part 4. How to Get Local Files on Apple Music for Windows
Even though Windows doesn’t allow direct access to Apple Music, you can still get access by uploading your files via iTunes. Check how to add local files to Apple Music Windows in these steps.
2.1 Upload Files to Apple Music
Step 1. First, download and install iTunes on your Windows device. Next, launch iTunes and select “File” > “Add File/Folder to Library” to add your album.
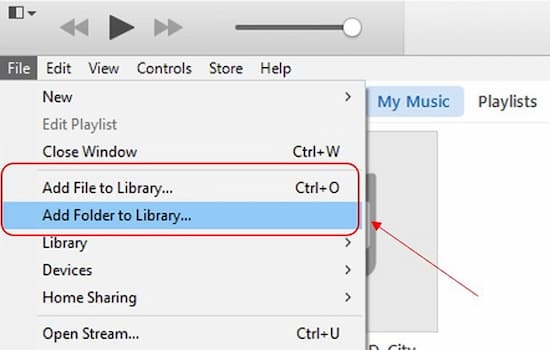
Step 2. Browse your album folder and add it to iTunes. Your music will then be added to your Library on iTunes.
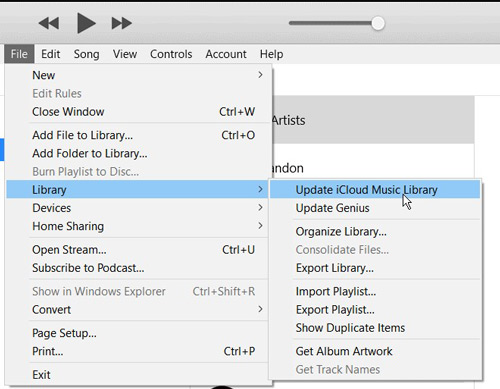
Step 3. Finally, you can now add your music to a playlist. Just go to the “File” > “Library” > “Update iCloud Music Library” option. Your music will then sync and be accessible on your other devices using iTunes or Apple Music.
2.2 Enable iCloud Music Library
If you want to sync your library to your other devices with Apple Music, it is also significant to enable the iCloud Music Library in iTunes.
Step 1. Head to the iTunes app on Windows and log in with your Apple ID.
Step 2. Next, select “Preferences” after choosing the “Edit” option.
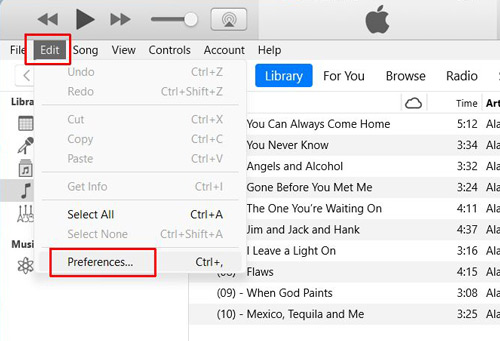
Step 3. Tap the “General” section in the opening window and check the “iCloud Music Library” option.

Part 5. Fix: Apple Music Local Files Not Syncing
If you encounter the Apple Music not syncing to iPhone, computer, or Apple Watch problem, please give those following troubleshooting solutions a shot:
- Check the Sync Settings: Please enable the ‘Sync Library‘ or ‘iCloud Music Library‘ settings.
- Update to the Latest Version of iOS/macOS: Make sure you have the newest version of the two systems.
- Check the Internet Connection: Sync issues can occur if your internet connection is unstable or slow
- Check the File Format: Ensure you added those files compatible with Apple Music (e.g., AIFF, Apple Lossless, MP3, AAC, and WAV).
- Check Your Apple Music Subscription: Adding local files to Apple Music on some devices requires an active subscription.
- Sign Out and Sign Back Into Your Apple ID: This can help refresh your Apple Music account and connection.
- Contact Apple Support: Contact Apple Support for further assistance to get more specific fixes.
Part 6. How to Download Playlists from Apple Music to Other Formats
You may wish to add MP3 to Apple Music among other formats. Even though streaming Apple Music requires iTunes or a Music app because it comes in an M4P format, you can still use AudKit Apple Music Converter to attain any output format.
This app will convert your Apple Music songs to common formats like AAC, M4A, and MP3, among others. It’s more powerful than other traditional Apple Music recorders, managing to convert Apple Music songs at a high speed of 30X rate.
It also supports ALAC lossless quality at 24 bit and 192 kHz which gives high output quality as the original file. The app will keep the original ID3 tags like title, composer, artist, etc. You will be able to listen to your Apple Music files offline forever on multiple devices like iPad, iPod, Amazon Echo, and many more.
Main Features of AudKit Apple Music Converter
- Easily adjust Apple Music parameters like audio channel, sample rate, etc.
- Preserve ID3 tags and the quality of Apple Music for an unlimited experience
- Support various output formats like AAC, FLAC, WAV, MP3, and M4A
- Download your Apple Music offline at a high speed of 30X rate
Visit the official website and hit on the “Download” tab to install the app on your computer. Then, launch it and you will notice that Apple Music opens automatically. Then purchase the full version as the trial version will only convert a third of each track. Just go to the “Menu” > “Register” option to enter the license email and registration code and attain the full version.
Step 1 Put songs from the Apple Music library into AudKit software
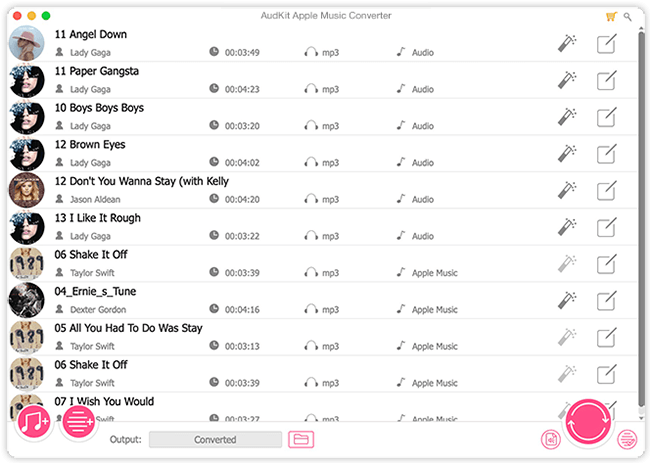
Choose the Apple Music hits that you want to convert from the library after hitting the “Add” button at the bottom left of AudKit Apple Music to import the files.
Step 2 Select an audio format for Apple Music
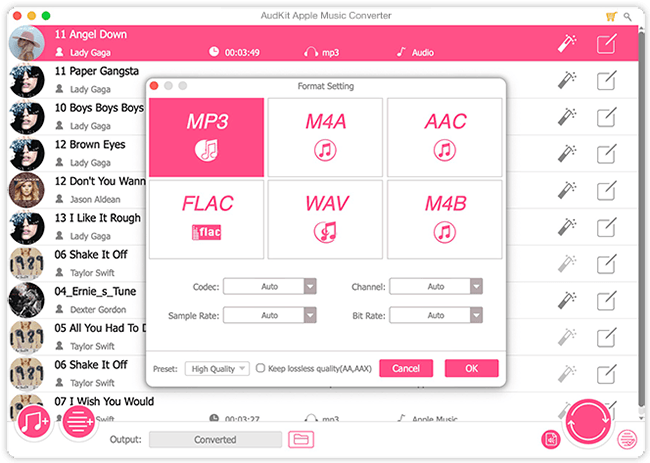
Go to the “Format” icon at the bottom-right corner of your screen and choose the format to convert your files into. Also, edit other parameters like sample rate, codec, and channel.
Likewise, with the two buttons next to the tracks, you can edit your files by changing the pitch, speed, and volume or split them as you desire by time, chapter, or segment. Then, hit on the “OK” button to make it effective.
Step 3 Launch the Apple Music conversion
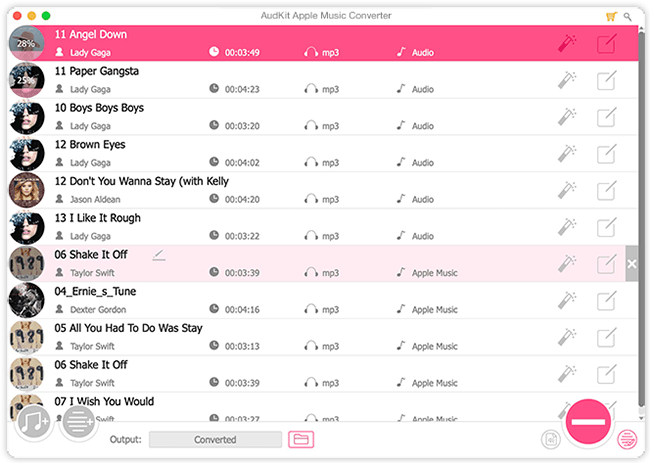
Hit on the “Convert” tab to start converting to Apple Music as per your earlier settings. Next, locate the converted Apple Music folder on your computer’s local disk. To find your converted music, click on the “Converted” folder on the AudKit app and let it open.
Now, you can listen to Apple Music offline without logging into your account. Also, you have the opportunity to transfer the Apple Music files to Spotify and other music services.
Part 7. In Conclusion
It’s now clear how to add local files to Apple Music on various devices. A computer is a necessity for loading your files to Apple Music. With the instructions discussed in this article, I hope that you can learn how to add songs to Apple Music easily and understandably.
You can also break further limitations and enjoy Apple Music in all output formats on any device, courtesy of the AudKit Apple Music Converter.

Andrew Rowley
Andrew Rowley has over 10 years of writing experience and is good at writing in audio technology and audio converter software. He can provide high-quality articles to help streaming music lovers explore music better.