As a Spotify user, you are sure to love its Play Queue feature, which lets you line up your favorite songs to play without a break. While Spotify automatically decides which tracks it will play next, it also allows you to manually add songs and podcasts to create a personal playlist you might revisit.
Speaking of, a too-packed Spotify queue will be no surprise to you over time, thanks to the massive collection of songs that Spotify offers. Maybe you added some extra sad songs, or perhaps you have an embarrassing playlist from your teens; luckily, Spotify has just the feature for you. Whether you use a desktop version or a mobile app, you can now easily clear Spotify queue to remove and add new tracks in a few clicks.
This article will show you how to clear queue on Spotify on multiple devices with quick step-by-step guides.

- Part 1. Clear Spotify Queue on iPhone
- Part 2. Clear Spotify Queue on Android Phone
- Part 3. How to Clear Spotify Queue on PC
- Part 4. How to Clear Spotify Queue on Mac
- Tip: How to Avoid to Clear Spotify Queue
- Conclusion
Part 1. How to Clear Spotify Queue on iPhone
On an iPhone, you cannot clear Spotify queue in a single go. That is, you will have to remove each song individually. However, the process is still a cakewalk.
Step 1. Open the Spotify app on your iPhone and play a song or video.
Step 2. Tap the song to display the playback controls and album artwork. Now, press the Queue icon present on the bottom right corner of the screen, which looks like an arrow over three horizontal lines.
Step 3. Once you enter the queue, individually tap on the circle beside each song you want to remove. Then, hit the large Remove button on the bottom left of the screen.
Part 2. How to Clear Spotify Queue on Android Phone
Are you an Android user? Worry not, because clearing your Spotify queue is as easy as it is for iOS users.
Step 1. Launch the Spotify app on your mobile and play a song or video.
Step 2. Tap the song to display the playback controls and album artwork. Now, press the Queue icon present on the bottom right corner of the screen, which looks like an arrow over three horizontal lines.
Step 3. Once you enter the queue, individually checkmark each song you want to remove, select all if you want to clear the entire queue. Then, hit the large Remove button on the bottom left of the screen.
Part 3. How to Clear Spotify Queue on PC
Unlike the mobile Spotify app, the PC version offers a “Clear” option to clear your playback queue in a single tap. Here’s how
Step 1. Open the Spotify application on your desktop, then click the Queue icon on the bottom right that looks the same as in the mobile app.
Step 2. Once inside the queue, click on the Clear option that will appear on the screen’s top right corner. This will remove all the songs from your queue.
Part 4. How to Clear Spotify Queue on Mac
Well, the method is almost the same for both a Windows PC and a Mac.
Step 1. Open the Spotify application on your Mac and play a song. Then click the Queue icon on the bottom right that looks the same as in the mobile app.
Step 2. Once inside the queue, you can view the total number of the songs on your list. Click on the Clear option above the enqueued songs. Your entire Spotify queue will be cleared.
Tip: Avoid Clear Spotify Queue – Convert Spotify Music to MP3
Do you often find yourself clearing your Spotify queue to make room for the latest songs in your playlist? Then we have a pro-tip for you. Although Spotify clear queue option is an appreciable feature, it can be a little boring. What’s better is to convert your Spotify music to mp3 and enjoy a long list of upbeat music without any hassles and that too, offline.
When it comes to downloading Spotify music, the process can be a bit trickier. But with the right tool, all can be done. And one such tool that is both handy and easy-to-use AudKit Spotify Music Converter. Using this intuitive tool, you can convert Spotify music to MP3, M4A, AAC, etc., within no time. The best part is that AudKit supports all types of Spotify audios, be it songs, podcasts, and more.
Even with the 5x faster conversion speed, AudKit offers HD quality audio output while also retaining full metadata for easy organizing. To top it all, you can download as many songs as you want using AudKit.
Follow these three easy steps to enjoy Spotify music offline.
Main Features of AudKit Spotify Music Converter
- Download Spotify tracks on local before they turn grey
- Convert Spotify music to common formats such as MP3
- Keep 100% lossless quality and ID3 tags in the output files
- Support to add Spotify music to other devices and players
Step 1 Download AudKit & import Spotify songs
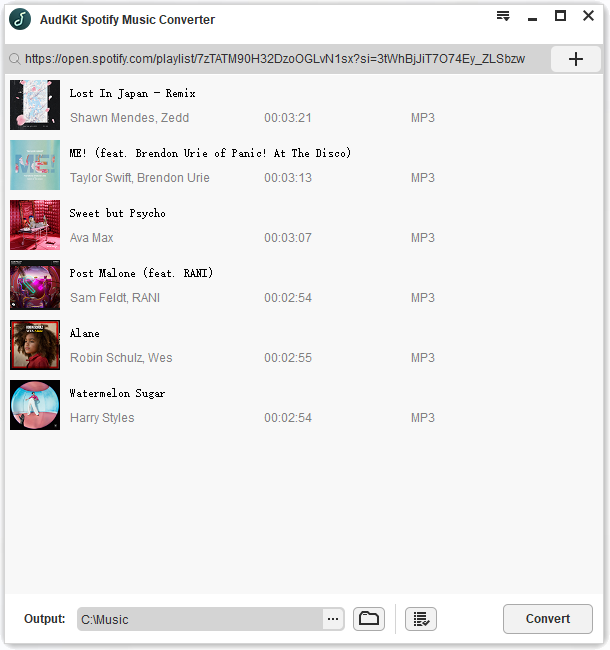
To download and install, choose the download option based on your system, whether you’re using Windows or Mac. Launch the software on the desktop.
Step 2 Customize output settings of Spotify songs
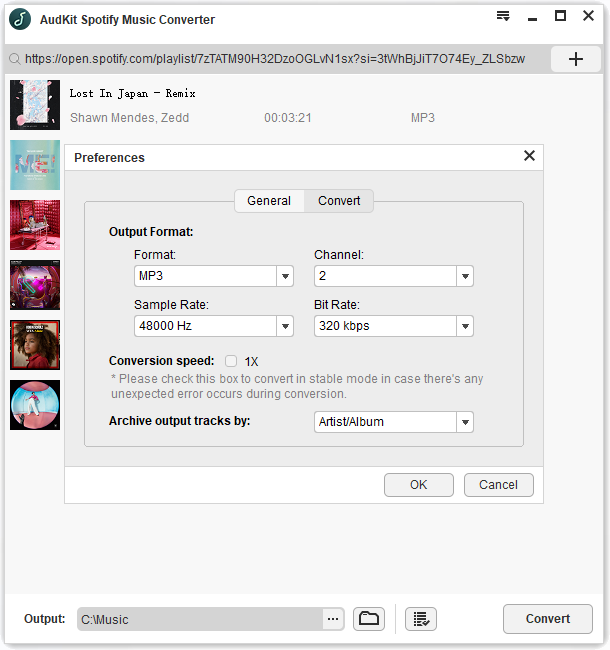
On AudKit’s main window, hit on Menu and then click on Preferences. In the Convert option, select an output format, bit rate, and even conversion speed. You can also specify how you would like your converted audio files to be organized for e.g., by Artist/Album.
Step 3 Download and convert Spotify songs
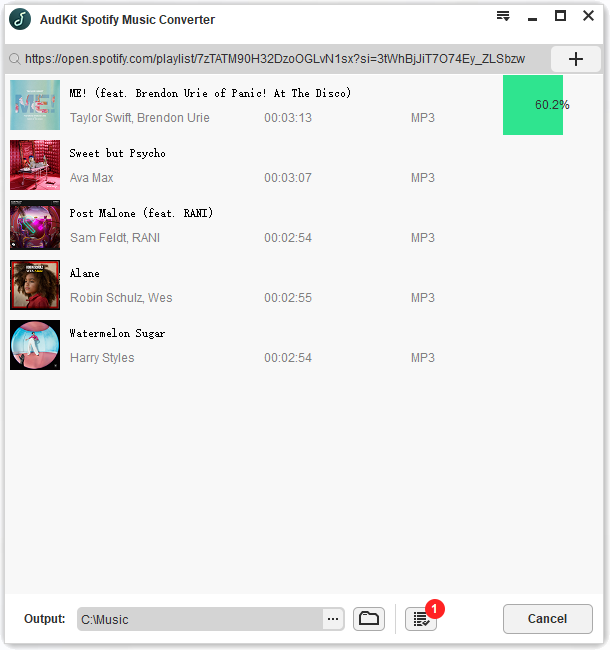
Once you reset the output parameters, open on Convert, then located the songs on the main page’s bottom right corner. All the songs will automatically start to convert then will be kept to the folder selected by you in original quality.
And voila! You’re all ready to enjoy Spotify music without the trouble of Spotify waiting to download.
Conclusion
From the straightforward guides mentioned above, you can see that whether you’re on a smartphone or a computer, it only takes a minute or two to clear Spotify queue. Now that you know how to clear queue on spotify, you might want to dive in and filter your playlist already.
Wrapping up, we would recommend you convert your favorite Spotify music tracks to mp3 and listen seamlessly without a worry.

