





Quick Answer: How to Make a Collaborative Playlist on Spotify
- On Mobile (iOS/Android): Open Spotify > Go to Your Library > Tap the “+” (Plus) icon to create a new playlist > Tap the Add user icon (a person with a plus sign) under the playlist name > Send the invite link to your friends.
- On Desktop (Mac/PC): Open the Spotify app > Right-click any existing playlist in your left sidebar (or create a new one) > Select Invite collaborators > Copy the link and share it.
- Keep in mind: The invite link expires in 7 days. Anyone with the link can add, remove, and reorder tracks. To keep your shared music safe forever and play it offline on any device, consider backing it up locally using a professional tool like AudKit Spotify Music Converter.
Music is inherently social. Whether you are planning a road trip, organizing a party, or just want to share your latest audio obsessions with a long-distance friend, Spotify’s collaborative playlist feature is an absolute game-changer.
In this comprehensive guide, I’ll walk you through exactly how to make a collaborative playlist on Spotify across all your devices. Plus, I’ll share a tech-savvy pro tip on the best tool to bypass playback restrictions and save your shared playlists locally in pristine, lossless quality.

- How to Make a Collaborative Playlist on Spotify Mobile (iOS & Android)
- How to Make a Shared Playlist on Desktop (Mac & Windows)
- The Pro Tip: How to Back Up Your Collaborative Playlists with AudKit
- FAQs About How to Create a Collaborative Playlist on Spotify
How to Make a Collaborative Playlist on Spotify Mobile (iOS & Android)
Most of us consume music on our phones. Thankfully, creating a shared group playlist on the Spotify mobile app is incredibly straightforward. The interface is nearly identical whether you are holding an iPhone or an Android device.
Here is exactly how to do it:
Step 1. Open Spotify and tap on Your Library in the bottom right corner.
Step 2. Tap the “+” (Plus) icon at the top right of your screen and select Playlist. Give your new masterpiece a fitting name.
Step 3. Once inside the new playlist, look just below the title. You will see an icon that looks like a music symbol♫ with a small plus sign (+). Tap it.

Step 4. A menu will pop up allowing you to share the invitation link. You can copy the link directly, or send it via WhatsApp, iMessage, Instagram, or email.
Important Note: The invitation link you generate is only valid for 7 days. If your friends don’t click it within that window, you will need to generate a new link.
How to Make a Shared Playlist on Desktop (Mac & Windows)
If you are the type of music nerd who prefers organizing your library with a mouse and keyboard, the desktop app makes collaboration just as easy.
Step 1: Fire up the Spotify app on your Mac or Windows PC.
Step 2: Look at the left-hand sidebar where your playlists live. You can either create a new playlist by clicking the “+” icon or choose an existing one.
Step 3: Right-click the playlist name in the sidebar. From the drop-down context menu, select Invite collaborators.
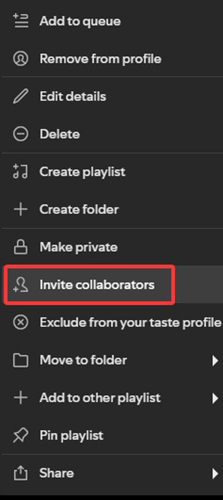
Step 4: The link is automatically copied to your clipboard. Paste it into Slack, Discord, or an email to your friends.
Once your friends click the link, their profile pictures will appear at the top of the playlist, and any song they add will display their avatar next to the track length.
The Pro Tip: How to Back Up Your Collaborative Playlists with AudKit
Let’s be real for a second. Collaborative playlists are incredibly fun, but they have two major flaws:
- The Sabotage Factor: Anyone with access can delete songs. If your buddy accidentally wipes half the playlist, it’s gone.
- Restrictions: Even if you have Spotify Premium and “download” the playlist for offline listening, you are only downloading DRM-protected cache files. You can’t put these songs on an MP3 player, burn them to a CD, or play them on DJ software like Serato.
If you want to truly own the collaborative mix you and your friends created, you need to extract the audio streams. In my years of testing audio software, the absolute best tool to download Spotify playlists is the AudKit Spotify Music Converter.
Main Features of AudKit Spotify Music Converter
- Easily download any Spotify audio content in 320kbps
- Convert Spotify music to MP3/AAC/FLAC/WAV/M4A/M4B
- Keep full ID3 tags like artist, year, cover, title, etc.
- Batch download at a fast 5X conversion speed
- Help listen to Spotify music offline anywhere
Why AudKit Spotify Music Converter?
AudKit is a powerhouse designed specifically to remove DRM and save your Spotify tracks as local files. Here is why it’s my go-to recommendation for my readers:
- True Offline Ownership: It converts your entire collaborative playlist into universal, DRM-free formats like MP3, AAC, WAV, FLAC, M4A, or M4B.
- Lossless Audio Quality: AudKit doesn’t compromise on sound. It rips the audio at a full 320kbps bit rate, ensuring your music sounds punchy and crisp on car stereos and high-end speakers.
- Keeps Metadata Intact: You won’t end up with a messy folder of files named “Track_01.mp3”. AudKit retains 100% of the crucial ID3 tags (Title, Artist, Album, Album Art, Track Number).
- Lightning-Fast Batch Conversion: You don’t have to record songs one by one in real-time. AudKit runs at 5X speed. You can drop a massive 500-song collaborative playlist into the software and let it batch-convert everything in the background.
How to Download Your Playlist Using AudKit
Using AudKit is incredibly intuitive. Here is the step-by-step workflow:
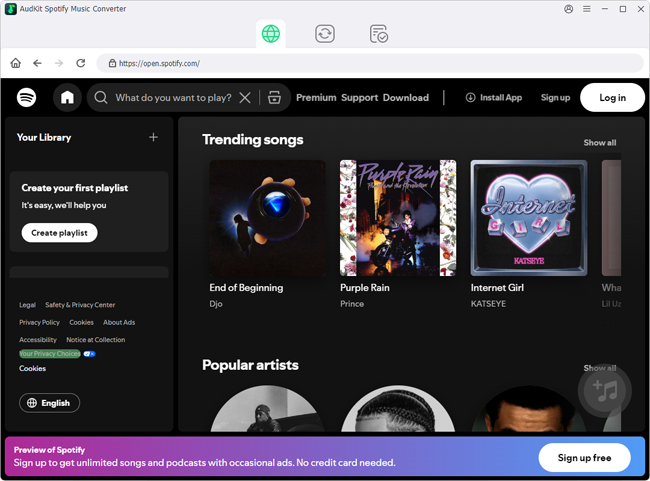
Step 1. Download and Launch
Install the AudKit Spotify Music Converter on your Mac or PC and open it. The Spotify app will launch automatically alongside it.
Step 2. Import the Playlist
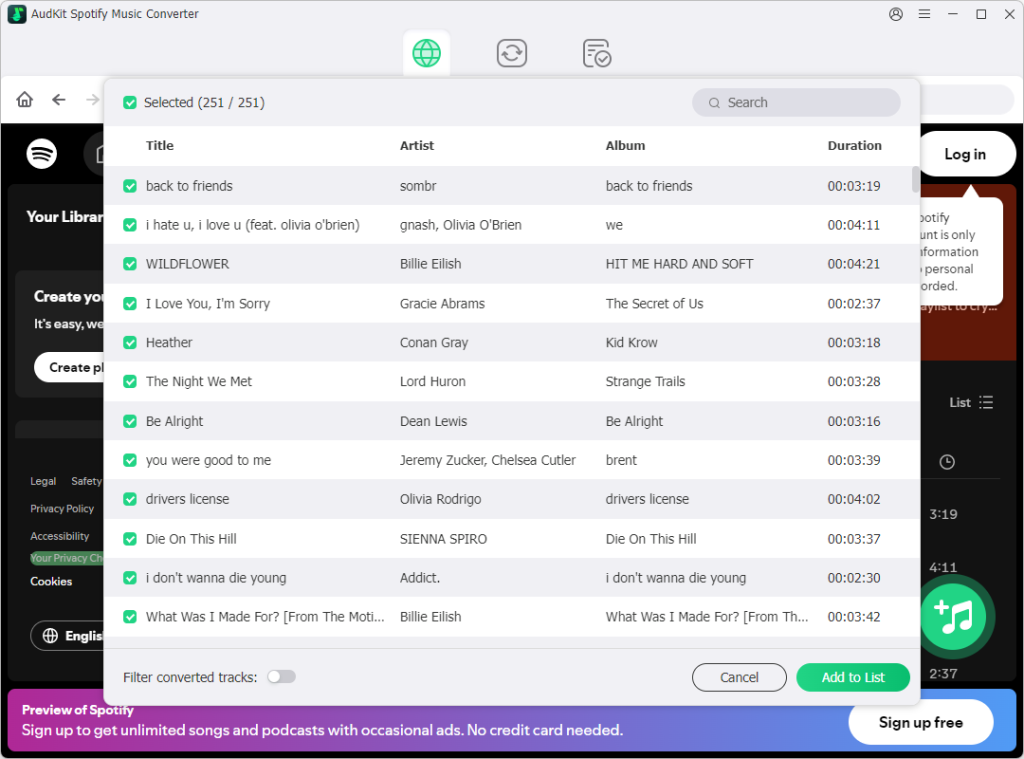
Find your finished Collaborative Playlist on Spotify. You can either drag and drop the playlist directly into the AudKit interface, or copy the playlist link and paste it into AudKit’s search bar, then click the “+” icon.
Step 3. Configure Output Settings
Go to the menu (top right) and select Preferences > Convert. Here, set your output format to MP3, the sample rate to 48000Hz, and the bit rate to 320kbps for maximum quality.
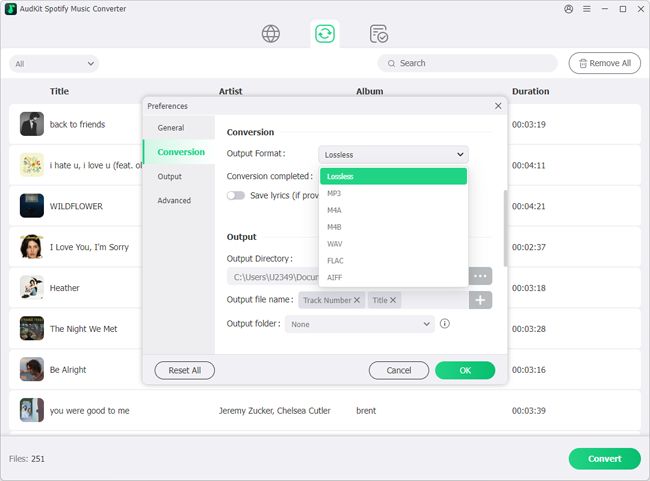
Step 4. Hit Convert
Click the large Convert button at the bottom right. AudKit will rapidly download your shared playlist to your local hard drive.
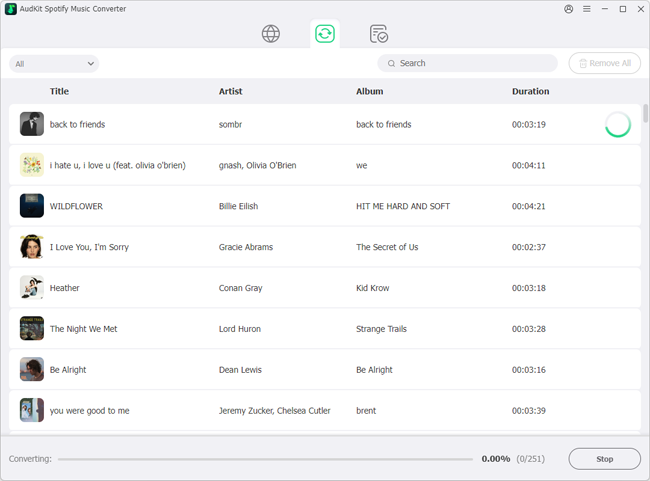
Now, even if your friends decide to delete the playlist, or if you cancel your Spotify Premium subscription, you have a hard copy safely stored forever.
FAQs About How to Create a Collaborative Playlist on Spotify
To wrap up, let’s address some of the most common questions I get asked about Spotify collaboration.
1. Can anyone join a collaborative playlist without a Spotify account?
No. To add, remove, or reorder tracks, the invited user must have an active Spotify account (either a Free or Premium tier). If you send the link to someone without an account, they will be prompted to sign up. (Note: You can use AudKit to download playlists whether you have a Free or Premium account!).
2. Can a collaborator delete my songs?
Yes. This is the double-edged sword of collaboration. Anyone who has accepted the invite link has the same administrative rights as you do regarding the tracklist. They can add songs, rearrange the order, and delete tracks—even the ones you added. This is exactly why backing up your playlist locally with AudKit is a smart move.
3. Is there a limit to how many songs we can add to a shared playlist?
Spotify allows you to add up to 10,000 songs per playlist. For context, 10,000 songs equate to roughly 700 hours of continuous music. You and your friends will likely run out of skips before you run out of space!
Final Thoughts
Creating a collaborative playlist on Spotify is one of the easiest and most enjoyable ways to bond over music. Whether you are using the mobile app on the go or managing your library from your desktop, sending an invite link takes just a few clicks.
Just remember that cloud-based music is borrowed, not owned. If you and your friends curate a truly legendary tracklist, don’t let it be at the mercy of accidental deletions or Spotify’s walls. Take control of your audio, utilize a reliable tool like AudKit Spotify Music Converter, and keep your favorite mixes playing on any device, forever.

Andrew Rowley
 Staff Editor
waitting