Among the many music streaming services, Tidal has a unique catch and high-res quality. Other than harboring a variety of music videos, podcasts, and live concert recordings, it’s also accessible on a vast array of devices like smart speakers, smartphones, and computers. However, these come with a concern of consuming too much space on your device. Nonetheless, you can clear Tidal cache to ease such congestion.
The relief is that the Tidal app cache bears temporary files that are stored on your device by the Tidal streaming app. When this space is freed up, you get rid of files that you no longer need and the storage it takes on your phone or other device is reduced.
Part 1. FAQs on Clearing Cache on Tidal
Here are answers to some commonly sought-after questions during the Tidal troubleshooting process.
Q1: Why You Need to Clear the Cache on Tidal
When cache on Tidal is cleared, you create more space which could have been occupied by the cache files.
Q2: Why Does Tidal Take Up so Much Storage Space
Tidal contains high-fidelity music with other innovative audios including MQA, and Tidal Dolby Atmos, among others. These need a larger bit rate and sample rate to support playback. This, therefore, needs additional space for storage hence the much storage space.
 Note:
Note:
It has an easy way to avoid get too much cache on Tidal while streaming music and downloading songs. It’s to download Tidal songs as local files and then explore them via other music players with AudKit Tidal Music Converter. This way won’t generate Tidal cache on your devices.
Part 2. How to Clear Tidal Cache on iPhone and Android
If your mobile phone’s Tidal app is running low on space, you can clear the Tidal cache on iPhone and Android as follows:
On iPhone
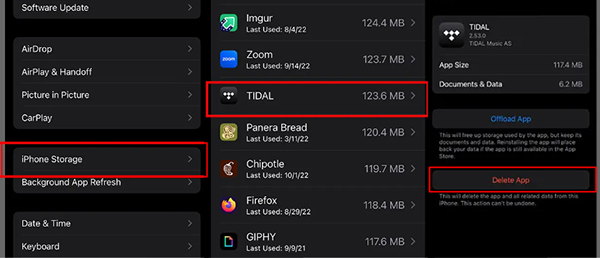
Step 1. Launch the “Settings” app on your iPhone device.
Step 2. Go to the “General” > “iPhone Storage” option.
Step 3. Next, choose the “Tidal” app then click on the “Delete App” option to clear the cache on Tidal on iPhone.
On Android
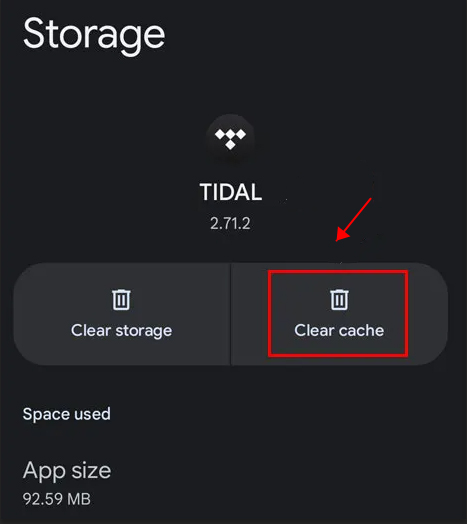
Step 1. First, press and long-hold the “Tidal” icon.
Step 2. Then, go to the app’s settings.
Step 3. Next, tap the “Storage & Cache” option.
Step 4. Click on the “Clear Cache” tab to clear Tidal cache on Android.
Part 3. How to Clear Cache on Tidal Mac and PC
Check out how to clear Tidal documents and data on your Mac and PCs.
On Mac OS
Step 1. First, open the “Tidal” for macOS app.
Step 2. Click on the drop-down menu and then a “Preferences” option will be shown.
Step 3. Tab on the “Cache” option.
Step 4. Next, hit on the “Clear Cache” tab and choose the “Clear” option to confirm the clearing action.
On a Windows PC
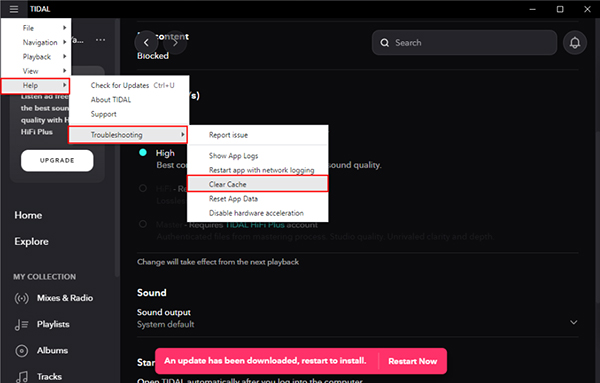
Step 1. Launch the “Tidal Windows” app then click on the “Menu” icon located in the top-left corner.
Step 2. Next, click on the “Help” > “Troubleshooting” > “Clear Cache” option. It will automatically clear Tidal documents and data from your Windows computer.
Part 4. Additional Tips for Clearing Tidal Cache
You can employ other tips to clear Tidal cache if the above options still don’t grant you the space you require. Also, in this part, you can learn more about Tidal clear cache.
Delete Tidal Downloaded Content
Deleting content will stop Tidal from taking up your device’s storage space. Follow these steps to manually delete such files.
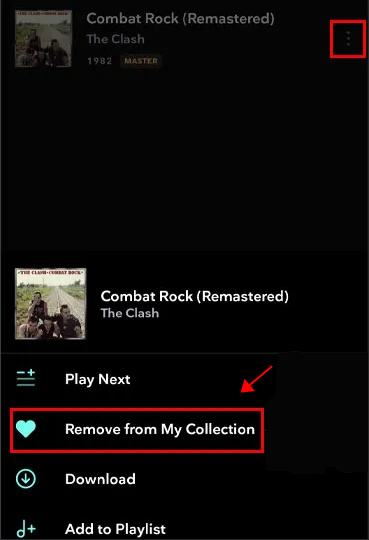
Step 1. Tap the “Profile” icon on your Tidal mobile app.
Step 2. Then, choose the target music content that you want to delete.
Step 3. Tap the “Three-dot” icon that’s next to the song, there are more available options.
Step 4. Once you found the “Remove from My Collection” section, please hit on it.
Step 5. Then, hit on the “Remove” option to remove your downloaded files.
Adjust Tidal Stream Quality
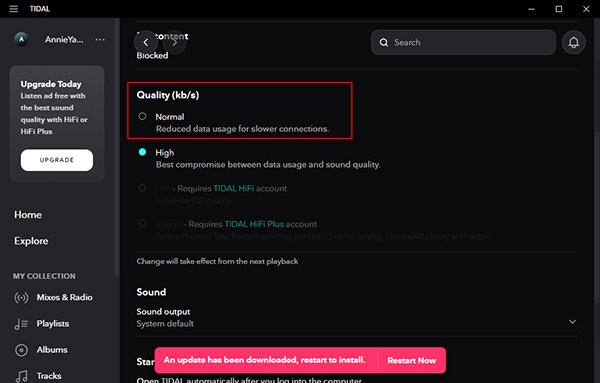
Streaming quality could be taking up too much space as Tidal streams are the quality of HiFi, MQA, 360 Reality Audio, and more. Here is how to adjust the quality for reduced storage usage.
Step 1. Launch the “Tidal” app on your phone, and then tap on the “Settings” icon.
Step 2. You’ll be redirected to the next view, tap on the “Streaming” option.
Step 3. Now, go on to adjust the quality under the “Quality” section as per your preferences.
Step 4. It’s recommended to choose the “Normal” mode section to adjust the streaming quality.
Other Things You Should Know about Clearing Tidal Cache
- Note that clearing the cache may log you out of the Tidal app. Make sure you have your login details at hand to avoid any inconvenience.
- You can act smart by occasionally clearing the cache to enable the app to keep running without any issues.
- Your downloaded files and playlists will remain intact even if you clear the cache. They don’t get deleted.
Part 5. How to Download Tidal Music as Local Files Forever
Without worrying about the Tidal album cache size, you can download and keep your files locally forever. AudKit Tidal Music Converter is a professional tool to look up to. It will losslessly convert your Tidal playlist to common output formats like FLAC, WAV, MP3, AAC, and M4B, among others.
You can also customize your Tidal music output quality including bit rate, channel, and sample rate. AudKit Tidal Music Converter will as well keep lossless Tidal quality such as artists, titles, album art, and tracks. Get the freedom to listen to Tidal hits on numerous devices offline.
Speed is another plus as it comes with a high-speed processor for conversion at 5X speed. Among the devices you can enjoy Tidal offline include DJ software, game console, MP3 player, etc. Additionally, this top-notch app will help you to import and play Tidal on other platforms like Google Home and iMovie.
How to use AudKit Tidal Music Converter to download Tidal music as local files
The AudKit Tidal Music Converter app supports both Windows and Mac. To use it, visit the website and download the app to your computer. Now, please launch it and wait for the Tidal app to open. Then go on to register for AudKit from the “Menu” > “Register” option from the top-right taskbar. You can copy and paste the licensed email and registration code to activate the app to the full version. This will enable you to convert to a full track rather than 1 minute of each song when you use the free version.
Step 1 Reset the Tidal output profile
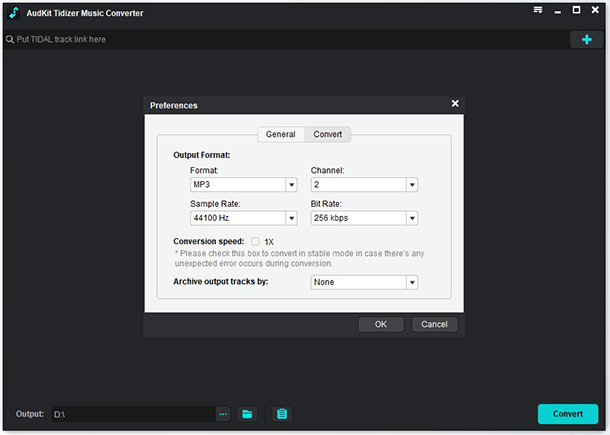
Click on the “Menu” > “Preferences” > “Convert” tab option. Then, customize the parameters of exporting Tidal files like sample rate, bit rate, and channel. You can also choose to archive your files by album or artist.
Step 2 Add Tidal Tracks to Download
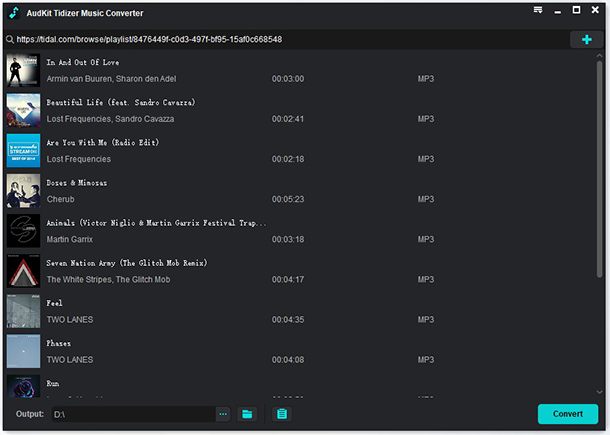
Choose the Tidal tracks you wish to convert from your playlist. Right-click on the Tidal song and select the “Share” > “Copy Track Link” option then, paste the link into AudKit’s search bar. Next, tap on the “+” icon to import your tracks.
Step 3 Download and Convert Tidal Songs Locally
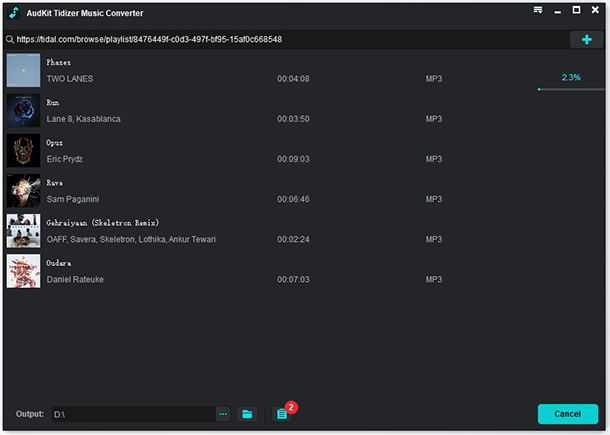
Finally, tap on the “Convert” tab to commence the conversion process. Once completed, locate the “Converted” icon that shows a red tip. Open it to access your converted Tidal songs. You can hence play and keep them forever.
Part 6. In Conclusion
You need to clear the Tidal cache on iPhone, Android, PC, Mac or other devices for several reasons. This article covers top best ways to stop Tidal from taking up too much storage space on different devices. Besides, you can also choose to keep your files locally forever with AudKit Tidal Music Converter. The steps are as easy as 1-2-3 and the results are lossless of high quality.

