




Quick Answer
- Use a dedicated desktop converter: Decode Tidal tracks directly into standard
.m4acontainers, saving complete ID3 tags, album art, and track details for offline playback. - Pick the right codec: Choose AAC (256–320 kbps) for lightweight, high-efficiency storage on mobile devices, or ALAC (16-bit/24-bit) to preserve bit-perfect Master/HiFi audio quality for audiophile gear.
- Transfer files anywhere: Move your exported M4A tracks to an iPhone or iPad via Finder/iTunes, copy them to a FAT32/exFAT USB drive for your car stereo, or load them into DJ software without platform playback restrictions.
Tidal delivers excellent sound quality, but its offline download feature comes with clear limits. Downloaded tracks are stored as encrypted cache files that only play inside the official Tidal app. You cannot copy these files to a USB drive, import them into your personal Apple Music library, or load them into DJ software and standalone media players.
Converting your Tidal tracks to the M4A format solves these playback restrictions. Unlike older formats, M4A gives you the flexibility to store high-efficiency AAC audio for everyday listening or uncompressed ALAC audio for bit-perfect fidelity—all while retaining full metadata and artwork.
This guide explains how M4A codecs work with Tidal streams, walks through the export process, and covers downstream workflows for car stereos, iOS devices, and DJ decks.
- Part 1. Understanding Tidal to M4A Conversion: AAC vs. ALAC Containers and Cache Limitations
- Part 2. How to Convert and Download Tidal Music to M4A Using AudKit Tidal Music Converter
- Part 3. Practical Downstream Workflows: Syncing Converted Tidal M4A Files to Apple Devices, Car Stereos, and DJ Decks
- FAQs About Tidal to M4A Conversion
Part 1. Understanding Tidal to M4A Conversion: AAC vs. ALAC Containers and Cache Limitations
When you tap “Download” in the Tidal mobile or desktop app, the software does not download a standard, self-contained audio file. Instead, it creates split, encrypted cache segments tied directly to your active subscription and device ID. Changing the file extension of these cached chunks to .m4a will not work because the files lack standard MP4 container headers (ftyp, moov, and mdat atoms) and cannot be parsed by standard media players.
Converting Tidal audio into a true M4A container wraps the decoded audio stream in a standard file architecture that any media player can read. The .m4a container supports two distinct audio codecs, each serving a different listening scenario:
- AAC (Advanced Audio Coding): A lossy compression format that delivers better clarity and high-frequency response than MP3 at matching bitrates (such as 256 kbps or 320 kbps). AAC is ideal when storage space is limited, such as on smartphones, smartwatches, or USB drives for in-car entertainment.
- ALAC (Apple Lossless Audio Codec): A lossless compression format that preserves 100% of the original audio data from Tidal HiFi and Max tiers (up to 24-bit/192kHz). ALAC works natively across the entire Apple ecosystem without requiring third-party plugins.
Beyond audio quality, standard M4A files store rich metadata within dedicated metadata atoms. This means your artist names, album titles, cover art, track numbers, and disc indexes remain permanently attached to the file across every player and operating system.
Part 2. How to Convert and Download Tidal Music to M4A Using AudKit Tidal Music Converter
Extracting clean M4A files from Tidal requires a desktop tool capable of decoding the stream and packaging it into a valid container structure. A dedicated tool like AudKit Tidal Music Converter handles this conversion cleanly without causing clipping, dynamic compression, or lost metadata tags.
Why AudKit Tidal Music Converter for M4A Audio Export
AudKit Tidal Music Converter provides a reliable way to save your favorite playlists and albums as standalone M4A files:
- Dual Codec Support: Export tracks in high-bitrate AAC for universal playback or ALAC for bit-perfect preservation of Tidal’s studio-quality tiers.
- Full Metadata Retention: Embedded tags—including track title, artist, album art, release year, genre, and track numbering—are written directly into the M4A atom structure.
- Batch Conversion Speed: The converter processes entire playlists and discographies smoothly on both Windows and macOS, preserving file organization without manual tagging.
Step-by-Step Tutorial: Convert Tidal Tracks to M4A
Step 1. Launch AudKit Tidal Music Converter
Download and install AudKit Tidal Music Converter on your computer. Open the application, and the built-in Tidal interface will load automatically. Log in to your Tidal account to access your collection.

Step 2. Select M4A as the Output Format
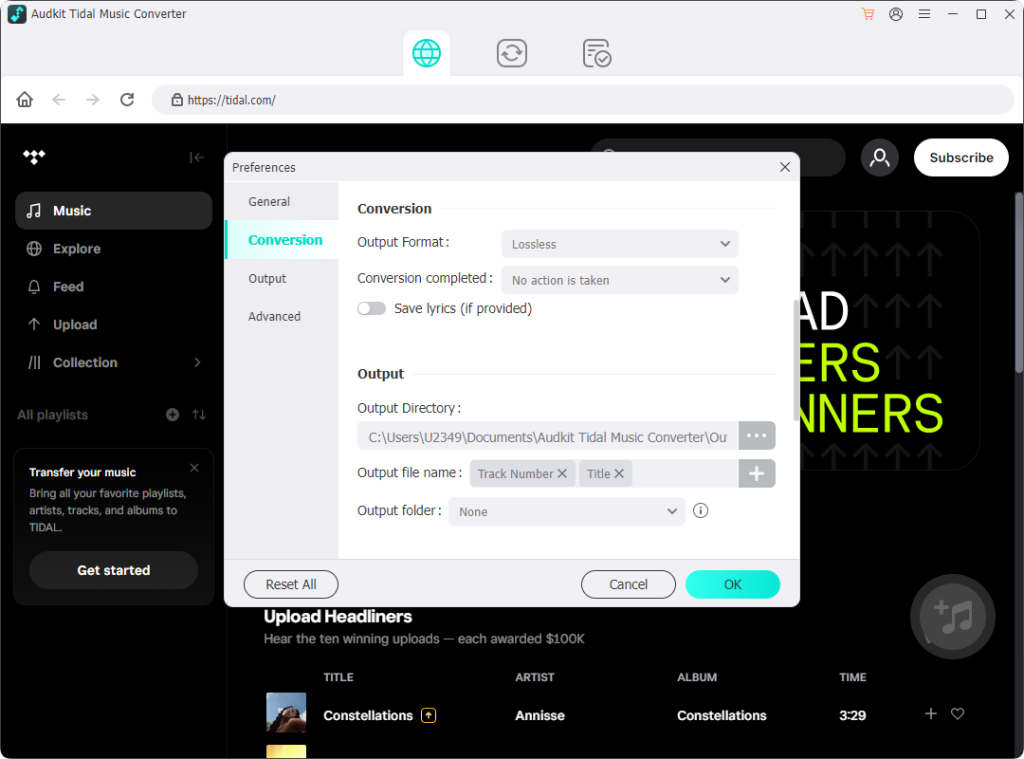
Click the menu icon in the top-right corner and select Preferences. Switch to the Convert tab. In the Format dropdown menu, select M4A. Here you can set your preferred channel configuration, sample rate (e.g., 44,100 Hz or 48,000 Hz), and bitrate (up to 320 kbps for AAC). Click OK to save your settings.
Step 3. Add Tidal Playlists to the Conversion Queue
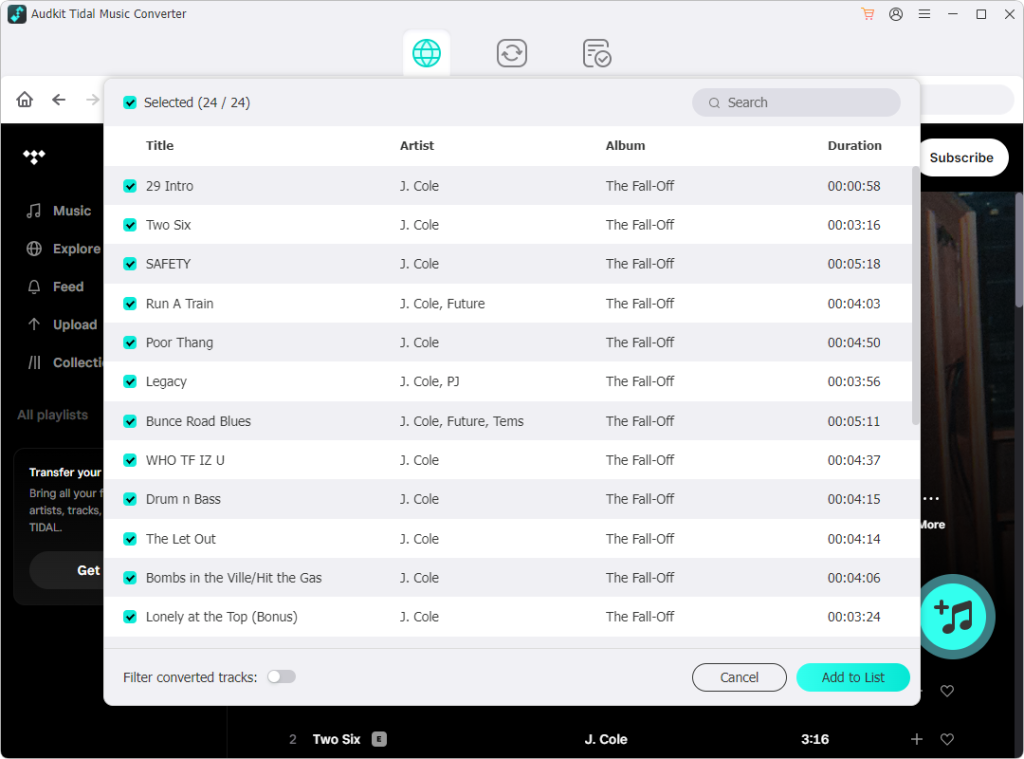
Browse your library within the built-in interface. Open any playlist, album, or track you want to convert, then click the yellow Add button in the lower-right corner. Review the list and uncheck any tracks you do not wish to export.
Step 4. Export and Locate Converted M4A Files
Click the Convert button to start processing the queue. Once finished, click the Converted folder icon at the bottom of the window to open your local directory and view the exported .m4a files.
Note: This tool is intended for personal backup of content you have the right to access. Please observe local copyright guidelines.
Part 3. Practical Downstream Workflows: Syncing Converted Tidal M4A Files to Apple Devices, Car Stereos, and DJ Decks
Sync M4A Tracks to iOS Devices via Finder or iTunes
Moving your converted M4A files to an iPhone or iPad lets you play them directly in the default Apple Music app without streaming data or third-party players:
- Connect your iPhone or iPad to your computer using a Lightning or USB-C cable.
- Open Finder on macOS (or iTunes on Windows).
- Drag and drop your converted
.m4afiles into your Apple Music or iTunes library window. - Select your iOS device in the sidebar, open the Music tab, and check Sync music onto [your device name].
- Choose whether to sync your entire library or specific playlists, then click Apply.
Set Up USB Drives for Seamless In-Car Stereo Playback
Playing M4A tracks via an in-car USB port requires preparing the drive with the correct file system and folder structure:
- Format the Drive: Format your USB flash drive to FAT32 (for drives up to 32 GB) or exFAT (for larger drives). Most factory head units cannot read NTFS or APFS drives.
- Create a Clean Folder Structure: Organize your audio files into
Artist / Album / Track - Title.m4afolders. This helps automotive head units index your files quickly and prevents sorting errors. - Keep Folder Sizes Reasonable: Some car stereos limit directory reading to 255 or 500 tracks per folder. Splitting large playlists across multiple subfolders ensures every track is recognized.
- Check Tag Encoding: Standard M4A tags display track information and album covers reliably on dashboard screens without extra setup.
Import Converted M4A Files into DJ Software Libraries
DJ applications run best with standalone local files that do not rely on an internet connection during a live set. Standard M4A files load quickly and provide stable waveform data:
- Open your DJ software of choice (Rekordbox, Serato DJ Pro, or Traktor Pro).
- Open the in-app Files browser and locate the folder containing your converted M4A tracks.
- Drag the files directly into your Collection or a specific Crate / Playlist.
- Highlight the imported tracks, right-click, and select Analyze Tracks. The software will calculate BPM, key, and beatgrids.
- Set your cue points and loops knowing the audio files will remain permanently accessible offline.
FAQs About Tidal to M4A Conversion
Is M4A lossy or lossless when converting Tidal to M4A?
It depends on the codec you select. If you encode to M4A using AAC, the file is lossy, offering a good balance between compact file size and clear 256–320 kbps audio. If you choose ALAC, the M4A container stores bit-perfect, lossless audio that matches Tidal’s original HiFi or Master stream.
Can I transfer converted Tidal M4A audio files directly to an iPhone or Apple Watch?
Yes. Once your tracks are saved as standard M4A files, import them into the Apple Music app on macOS or iTunes on Windows. From there, sync the files to your iPhone via a USB cable, or transfer specific playlists to an Apple Watch using the Watch app on iOS.
Why can’t I just rename Tidal offline cache files to .m4a to play them?
Tidal caches tracks in fragmented, encrypted data blocks readable only by its proprietary player engine. Renaming the extension does not reconstruct the missing MP4 container headers or decode the audio, so standard media players will fail to open the file.
Does AudKit Tidal Music Converter retain original ID3 metadata and album art?
Yes. AudKit Tidal Music Converter embeds full metadata directly into each exported M4A file, preserving track titles, artist names, album titles, track numbers, release years, and cover artwork for clean organization across all players.
Conclusion
Converting Tidal to M4A gives you full control over how and where you enjoy your music library. By repackaging streaming audio into standard M4A containers, you bypass platform-specific app limitations while preserving high audio fidelity and complete metadata.
Whether you need space-saving AAC files for an in-car USB drive or uncompressed ALAC files for an Apple Music setup, M4A provides broad compatibility across modern playback hardware.
Using a dedicated desktop tool like AudKit Tidal Music Converter ensures a quick, clean conversion process, leaving you with organized, permanent audio files ready for personal offline listening on any device.

Andrew Rowley
 Staff Editor
Andrew Rowley has over 10 years of writing experience and is good at writing in audio technology and audio converter software. He can provide high-quality articles to help streaming music lovers explore music better.