





Quick Answer: How to Use Spotify Music in Canva
- The Core Issue: Canva does not support direct Spotify integration because Spotify tracks are encrypted in DRM-protected OGG format. Canva only accepts standard formats like MP3, M4A, or WAV.
- The Solution: You need to use a reliable audio converter to convert Spotify to MP3 first.
- Action Steps: Download songs as local files using AudKit Spotify Music Converter, then upload those DRM-free MP3s directly to Canva’s “Audio” tab.
Canva is a free cloud-based graphic design tool that can be used to create a variety of content including presentations, videos, invitations, infographics and more. Adding music to your Canva designs can take your projects to the next level, especially when it comes to video projects. While Canva offers a diverse range of stock music, sometimes you may want to incorporate your favorite tunes from Spotify. So in this article, we’ll cover how to add Spotify music to Canva with ease.
Part 1. FAQs about Adding Spotify Music to Canva
Q1: Can You Add Music to Canva Video from Spotify?
A: You can’t directly add music on Canva from Spotify because Spotify music is protected and isn’t licensed for use in video editors. But you can embed a Spotify link in Canva. Note that when you share your design, viewers will need to click on the hyperlink to be redirected to the Spotify page.
Q2: How to Embed Spotify Link in Canva Design?
A: Step 1. Open the Canva design you want to add the Spotify link to.
Step 2. Click on the “Text” tab on the left-hand side of the screen and choose the text box.
Step 3. Type or paste the Spotify link into the text box, highlight the link and click on the hyperlink icon in the top toolbar.
Step 4. In the pop-up window, select “Web link” and paste the Spotify link into the URL field.
Step 5. Click “Apply” and your Spotify link will now be embedded in your Canva design.
Q3: Can I Use My Own Music in Canva Video Slideshow?
A: Yes, you can use your own music in a Canva video slideshow. You just need to make sure that the file format is compatible with Canva.
Part 2. How to Add Music to Canva from Spotify – Preparation
Canva allows you to upload your own media, but it only accepts standard audio formats like MP3, M4A, and OGG. Since downloaded Spotify music is encrypted with DRM (Digital Rights Management), it cannot be recognized by Canva. To fix this format incompatibility, you must convert Spotify to MP3.
AudKit Spotify Music Converter is widely regarded as one of the best Spotify converters for this job. It is a powerful, safe, and ad-free desktop application that allows you to download Spotify songs, playlists, and podcasts as local files. By using AudKit, you can easily convert Spotify to MP3 at 320kbps high quality, ensuring your Canva videos sound professional and crystal clear.
Main Features of AudKit Spotify Music Converter
- Download Spotify music as local files for Canva
- Remove the protection of all Spotify content
- Convert Spotify music to multiple audio formats at 5X speed
- Provide lossless conversion along with 100% original audio quality
How to Download Spotify Music as Local Files for Canva
After downloading the AudKit software on your computer, now you can follow the steps below to download Spotify music as your local files so as to add music to Canva video.
Step 1 Add Spotify music to AudKit Spotify Music Converter
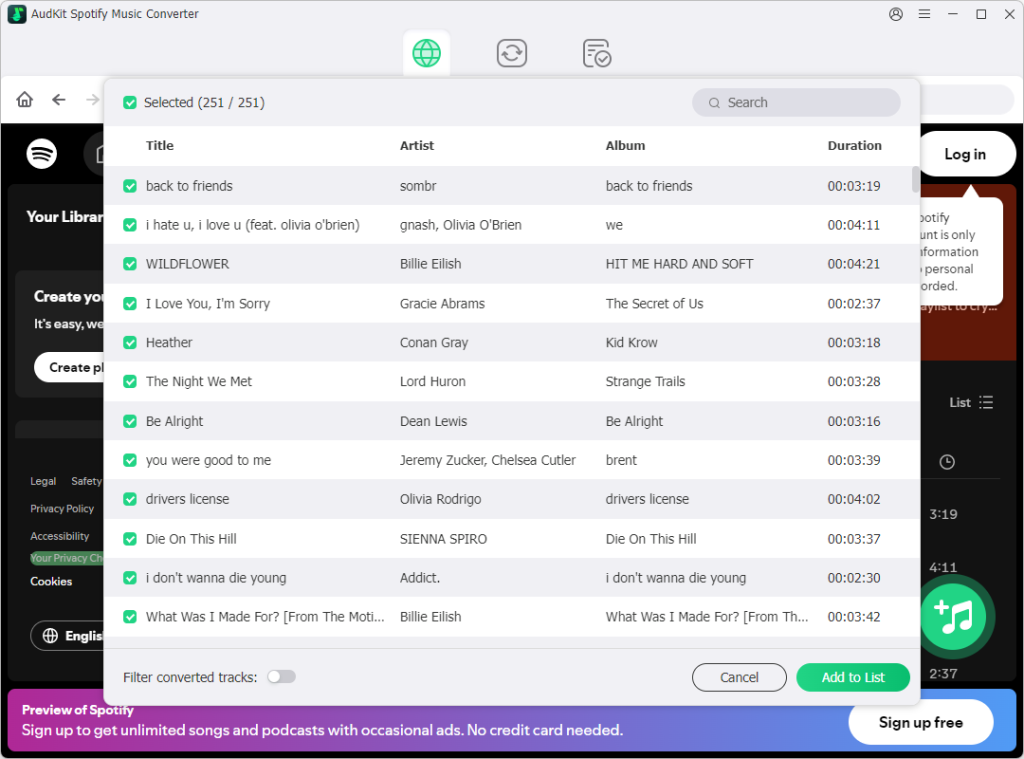
When you open the AudKit tool on your computer, it will automatically launch the Spotify app for you. You can directly find Spotify songs that you would like to add to Canva. Then simply drag and drop your desired songs from Spotify to AudKit software. Or you can also right-click the Spotify song, and choose “Share” to copy the song URL. Then paste the URL into the search bar and click “Add“.
Step 2 Adjust output settings of Spotify music for Canva
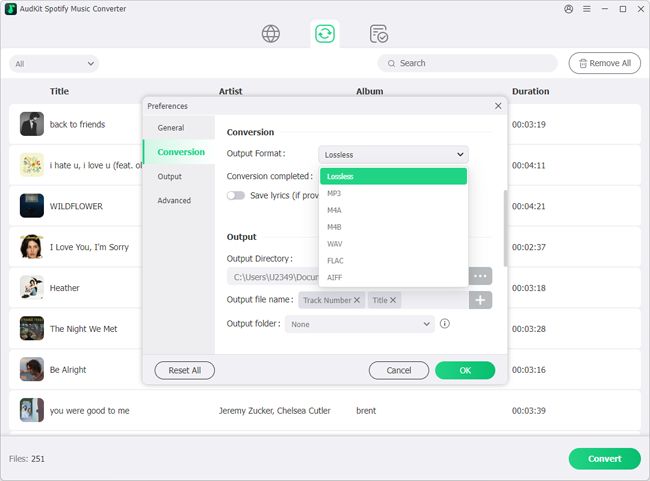
In this step, you can adjust the output settings of Spotify music as you want. Find the three-line menu bar at the top right of the AudKit. Click it and then choose the “Preferences” option in the drop-down list. This will open a preferences window where you can change general and advanced settings. Click the “Convert” button, and then set MP3 as the output format. You can also adjust other parameters such as channels, sample rate, bit rate, etc.
Step 3 Download Spotify music locally for Canva
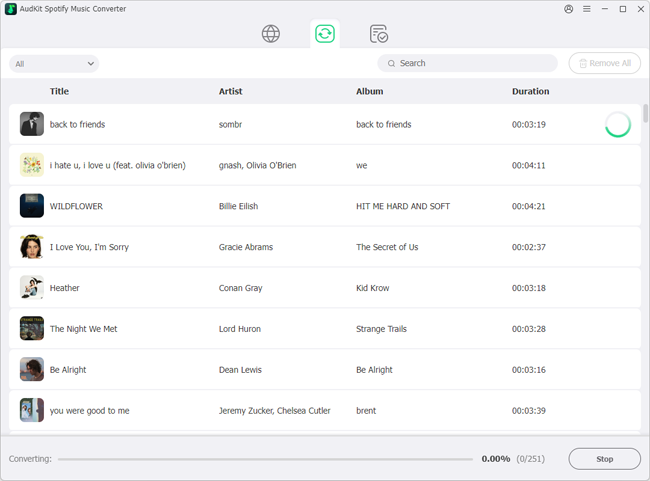
After adjusting all your desired settings, finally, you can start the download process with one simple click. Simply click the “Convert” button at the bottom, then it will convert and download all your added Spotify music at up to 5X speed. When the download process is done, you can get the converted Spotify music as local files on your computer. Then you are ready to add Spotify music to Canva and listen to Spotify offline without Premium on your computer or any other devices as you want.
Part 3. How to Upload Spotify Audio to Canva Video
After getting the Spotify music as your own music, the question now becomes: how to upload music to Canva? The process is slightly different on desktop and mobile, so I’ll provide instructions for both. Whether you’re creating a marketing video, a tutorial, or a vlog, adding Spotify audio can help you stand out and connect with your audience. Let’s get started!
How to Add Spotify Audio to Canva Video on Desktop
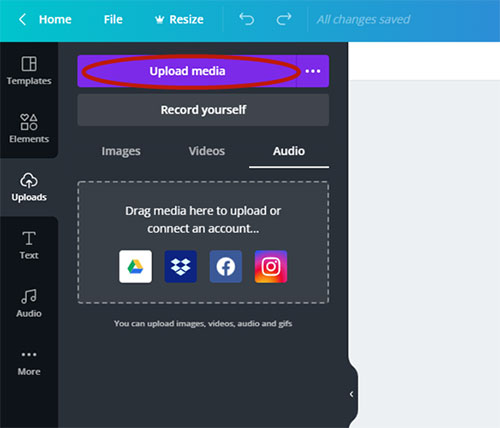
Step 1. Open Canva, open your design or make a new design.
Step 2. From the left navigation pane, click the “Uploads” tab and then select the “Upload Media” option.
Step 3. Find your downloaded Spotify songs on your computer, then upload them to Canva.
Step 4. Go back to the left navigation pane, and click the “Audio” tab.
Step 5. Here you can see all your added Spotify songs. Click them to import music to Canva video.
How to Put Spotify Music on Canva on Mobile
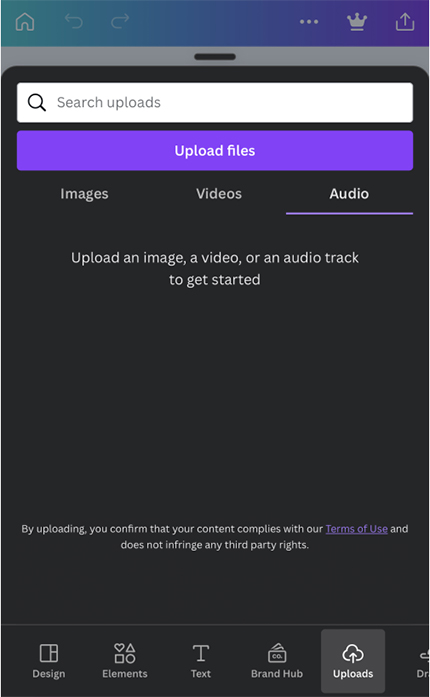
Step 1. Make sure you’ve uploaded your Spotify music to your Android or iOS device from your computer ahead of time.
Step 2. Go to your Canva design on your phone and select the “Uploads” option.
Step 3. Tap the + button in the lower left corner and scroll to “Uploads“.
Step 4. Upload a video and Spotify music clip from your personal library to your dashboard.
Step 5. Click on the Audio icon and drag and drop your Spotify media.
Part 4. How to Adjust Spotify Sound in Canva
With Spotify music as the soundtrack to your Canva productions, you can easily create videos for social media, marketing campaigns, or personal projects. However, editing Spotify sound in a Canva video can be a bit tricky, especially if you’re new to the platform. Now, we’ll walk you through the detailed steps on how to use Spotify sound in a Canva video, so you can create professional-looking videos that sound great.
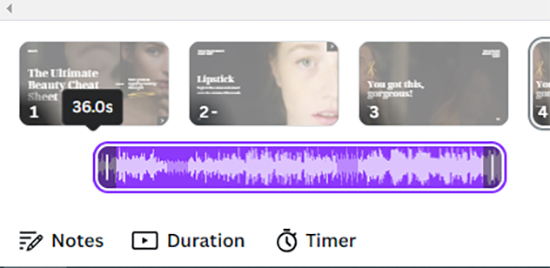
Step 1. Click the icon at the end of the Spotify audio and select Adjust.
Step 2. Drag the audio waves into the colored section of the soundbar.
Step 3. Click the Plus symbol to add a page, and every time you do that another five seconds will be added to your project.
Step 4. Change the starting point of your Spotify audio by hovering over the start point and clicking and dragging to the right.
Step 5. Change the ending point by hovering over the end of the track and then clicking and dragging to the left.
Step 6. Remove the audio by clicking the Delete icon in the right upper corner of the Canva screen.
Step 7. Change the audio’s volume to zero by dragging the volume slider to the left.
Step 8. You can also add multiple Spotify audio tracks to add voiceovers and sound effects to the mix.
Step 9. Once you’re happy with your edits, click on the Download button to export your video with the new audio.
Part 5. Conclusion
Adding Spotify music to a Canva design instantly elevates its production value, making your marketing campaigns, vlogs, or presentations more engaging. While direct integration is impossible due to DRM limitations, using a dedicated tool like AudKit Spotify Music Converter bridges this gap perfectly.
By converting your favorite Spotify tracks into high-quality MP3s, you gain full control over your creative assets. Follow the steps outlined above, and you’ll be seamlessly blending Spotify hits into your Canva masterpieces in no time.

Andrew Rowley
 Staff Editor
waitting