

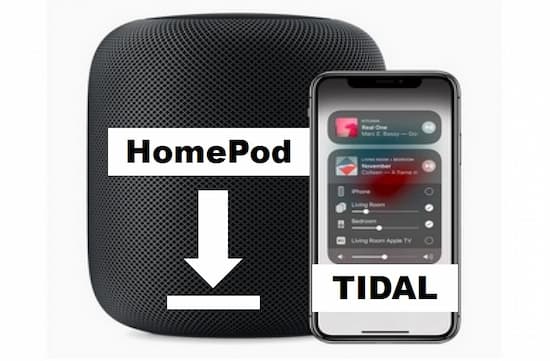
Does Tidal music work with an Apple HomePod? Well, that question was so obvious! Tidal has continued to make a huge name for itself with its superior sound quality including CD-quality and Hi-Fi lossless quality audios.
Think of the best-sounding wireless smart speaker and you’ll quickly point to Apple’s HomePod. It comes with high-end features, enabling you to control it by voice with Apple’s virtual assistant – Siri, control smart-home appliances and even play music, among other functionalities.
Even though Apple Music is the only streaming service that HomePod can rely on for voice control, you can still enjoy Tidal music on HomePod. Advanced technology of HomePod lets you unleash music from Tidal and other streaming services.
Method 1. How to Play Tidal on HomePod with iCloud
Setting up HomePod requires you to pair it with an iCloud ID account. The iCloud ID manages various Apple services. You, however, need an iOS device to set it up. These include iPad, iPod Touch, and iPhone, among other lists of compatible devices. To play Tidal on HomePod from iTunes, you need to sync all tracks to the iCloud Music Library with iTunes Match.
It doesn’t end there! You need a third-party tool to help you get Tidal to the iTunes library. AudKit Tidizer Music Converter works with simple steps to convert your music into playable formats. It supports various output formats like WAV, FLAC, MP3, etc.
Furthermore, it will convert your files at a speed of 5X, letting you work your files in batches within a limited time. And you can simply play Tidal on HomePod when the music has been converted.
Main Features of AudKit Tidizer Music Converter
- Convert Tidal to MP3, AAC, M4A, etc.
- Download Tidal HIFI music without quality loss
- Reset output profiles of Tidal as required
- Save original sound quality and ID3 tags
To get Tidal Playlists on your computer, first download AudKit Tidizer Music Converter. Click the ‘Download’ tab to download and install the tool. Then launch it and the built-in Tidal tool will open up. Next, open the ‘Menu’ > ‘Register’ option to unlock Tidal features. You’ll then copy and paste the licensed email and registration code and the app’s full version will be activated.
Step 1 Reset the output settings
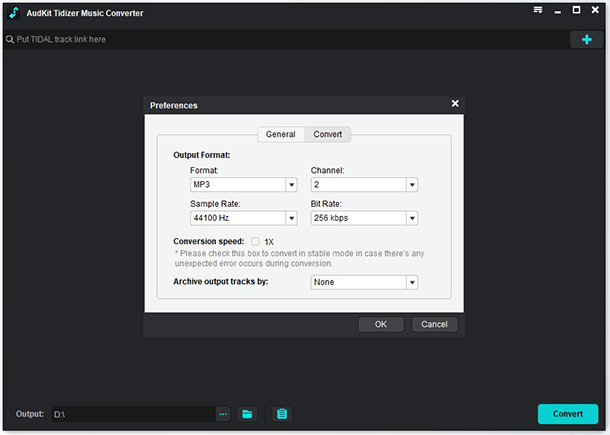
Go to the top-right menu icon and hit the ‘Preferences’ tab then chose the ‘Conversion’ option. Then customize the output format, bit rate, sample rate, and many others.
Step 2 Import Tidal songs for HomePod
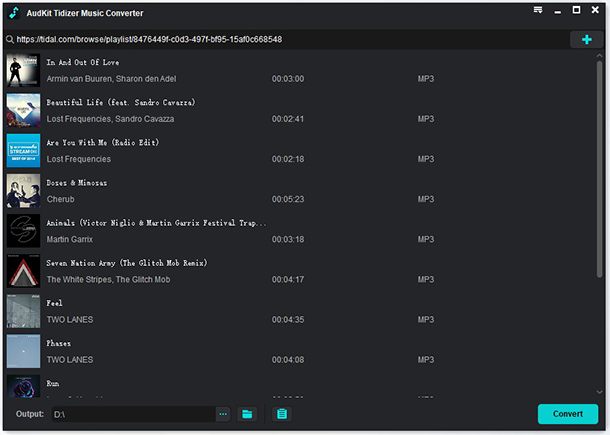
Open any Tidal playlist from the built-in Tidal app. You will immediately realize the ‘Add Music’ button glittering in the lower-right corner. Click on it to select a playlist. You can also import a single song from the playlist.
Step 3 Download and Convert Tidal playlist for HomePod
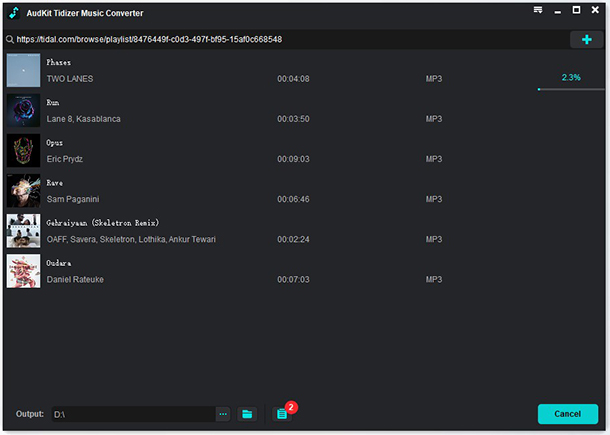
At this step, hit the ‘Convert’ button found at the bottom-right and AudKit Tidizer will commence the conversion process. You can as well add more songs to the converting list during the conversion. A red tip will show on the ‘Converted’ icon once all projects for conversion are complete. Open the converted icon to locate the converted Tidal playlist.
You can also access the local output folder that saves all converted Tidal playlists from the ‘Search’ icon. This icon will show up when you move the cursor to the file. You will have downloaded songs from Tidal onto your computer. Simply transfer them to HomePod for offline listening.
Step 4 Import the converted Tidal tracks to the iTunes library
Import the converted Tidal playlist to the iTunes library to enable you to listen to Tidal on HomePod. Then use iTunes Match to sync your files to your iCloud Music Library. Follow these steps.
- Please ensure that you have subscribed to iTunes Match. It’s only then that you will see the ‘Sync Library’ tab on the iTunes app.
- Launch the iTunes app on your computer.
- Click on the ‘Menu bar’, choose ‘Files’ > ‘Add file to Library’. Check out the converted Tidal audio files then add them to the iTunes library.
- Next, hit on the ‘Edit’ > ‘Preferences’ options on the Menu bar.
- Turn on the ‘Sync Library’ option in the ‘General’ section. Next, click on the ‘OK’ button to apply all changes.
- Lastly, easily get Tidal on HomePod and start listening right from your iTunes library.
Method 2. How to Get Tidal on HomePod with AirPlay
You can get HomePod over Airplay if the Tidal streaming app is on an iOS device with the AirPlay option. AirPlay is a free-to-use technology that is built into iOS devices to let you stream audio and other video files between compatible devices. Stream your Tidal music on HomePod with AirPlay via these steps.
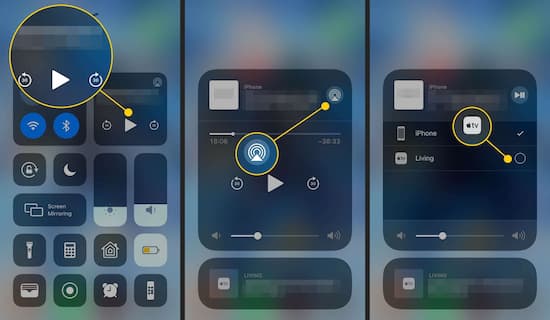
Step 1. Check that your HomePod and iOS device are on the same Wi-Fi network and that Bluetooth is turned on.
Step 2. Turn on your iOS device ‘Control Center’ by either swapping up or down the screen depending on your iOS device version.
Step 3. Check the top-right corner of the ‘Music Control’ and tap the ‘AirPlay’ icon.
Step 4. You’ll manage to see a list of ‘AirPlay devices’. Go to the ‘Speakers & TV section’ and tap the name of the ‘HomePod’ to which you want to stream. Next, close out the ‘Control Center’.
Step 5. Open Tidal music streaming service.
Step 6. Then begin playing your music and it will stream to the HomePod you selected earlier in step 4.
You will need to be Tidal Premium or HiFi subscriber to get Tidal on HomePod with AirPlay.
Part 3. Conclusion
These two ways let you get Tidal on HomePod. The first option lets you download your music to iTunes then sync them to the iCloud music library via iTunes Match for offline playback. More so, you don’t need any subscription. However, the second option requires you to be on a Premium or HiFi subscription. The ball is now in your court!

Elle Johnson
Elle Johnson has been working in the technology and music software field for over 5 years. She is dedicated to providing easy-to-use guides and effective tips to play music anywhere.