As compared to other operating system devices, Windows OS is the most used at about 70%, followed by MacOS at about 20% and Linux OS-based at below 5% among many other OS devices. Do Windows OS users have a solid reason for this magnitude? Probably yes, especially due to its intuitive user interface. And Microsoft completes the equation by incorporating Windows Movie Maker as a part of the Windows Essentials software suite. With this editor, you can make quick movies from your video clips, photos, and music. You can even get Spotify to Windows Movie Maker with the assistance of a reliable converter tool.
Besides, other editing capabilities make Windows Movie Maker a top choice for Windows OS users. You don’t need an in-depth understanding of the program but you can create wonderful movies and directly post them on social media platforms like YouTube, Tiktok, Facebook, etc. The free version is good enough for a quick fix on simple video projects. However, the Pro version will give you added features like transition effects and animated pan-zoom for your still photos. But our focus is to add Spotify music for that compelling background music effect on your video. How do you do that?
Part 1. Add Spotify Music to Windows Movie Maker – Tool Required
Well, you need a reliable tool like AudKit Spotify Music Converter to make your music files acceptable and playable outside Spotify apps and browsers. The reason is that Spotify encrypts its files in OGG Vorbis format that is non-playable on any video editor or player. AudKit works smartly to download and convert Spotify files into MP3, WAV, among others. These formats are then playable offline on Windows Movie Maker or any device or platform.
Furthermore, AudKit is built in an advanced technological mechanism that can keep all the ID3 tags and metadata information, enabling a 100% lossless audio quality of the original files. It carefully preserves the track numbers, titles, albums, artists, among other data in the raw metadata. You can even organize and manage the local music library after conversion by album or artist. That is easy for file location when using Windows Movie Maker.
AudKit Spotify Music Converter for Windows Movie Maker
- 5X fast conversion speed of aiding batch Spotify song downloads
- Keep 100% lossless sound quality and metadata information.
- Reset Spotify output settings like sample rate, codec, channel, etc.
- Convert Spotify to WAV, AAC, MP3, and other common output formats
Part 2. How to Upload Spotify Music to Windows Movie Maker
To play Spotify to Movie Maker 10, first, visit the AudKit Spotify Music Converter official page and click on the “Download” button to download the Windows version. You can also opt to buy the Premium version by going to the “Buy Now” tab.
Step 1 Install AudKit Spotify Converter app and load music
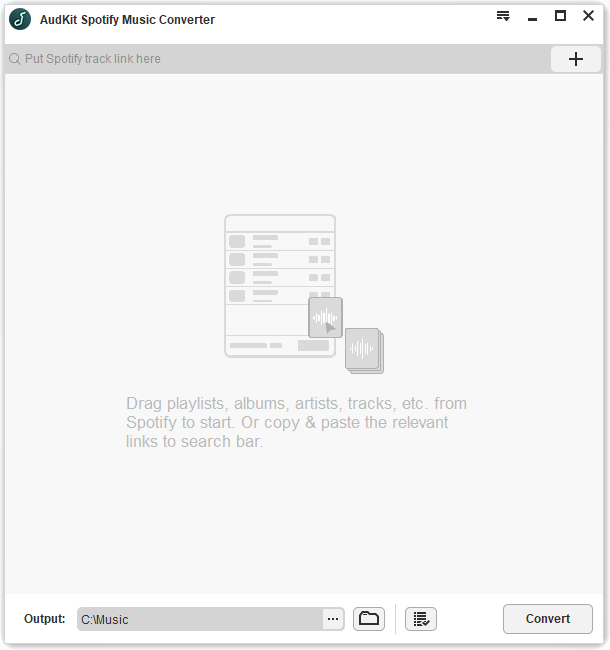
When you install and open the AudKit Spotify Music Converter app, the Spotify app will automatically launch at the same time. Then select the playlist you want to download from your Spotify Music Library. You can copy the song’s link and paste it on the Converter’s app search bar or directly drag and drop the songs to AudKit’s interface. Then hit on the “+” icon to add the selected music.
Step 2 Reset Spotify output settings for Windows Movie Maker
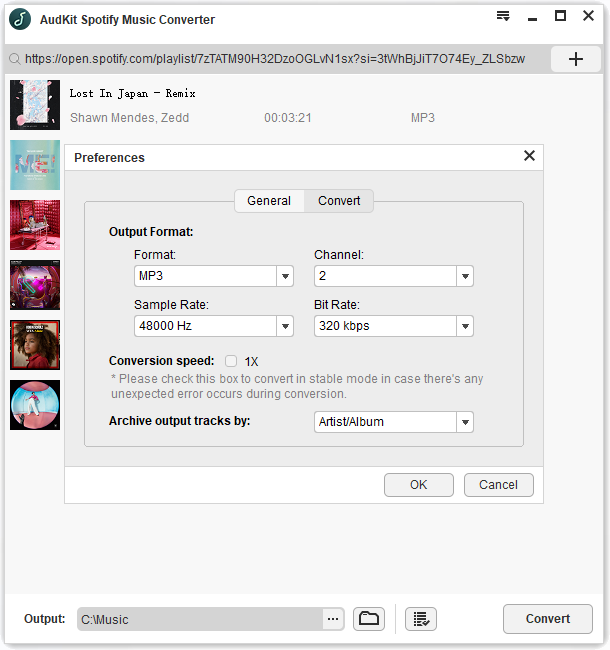
Click the top “Menu” icon to unfold the “Preferences” option. Then change Spotify output format to a common output format like MP3 or other. Also, customize other parameters like channel, sample rate, bit rate, etc. Then click on the “OK” button and the program will start to customize the settings.
Step 3 Download and convert your Spotify music for Windows Movie Maker
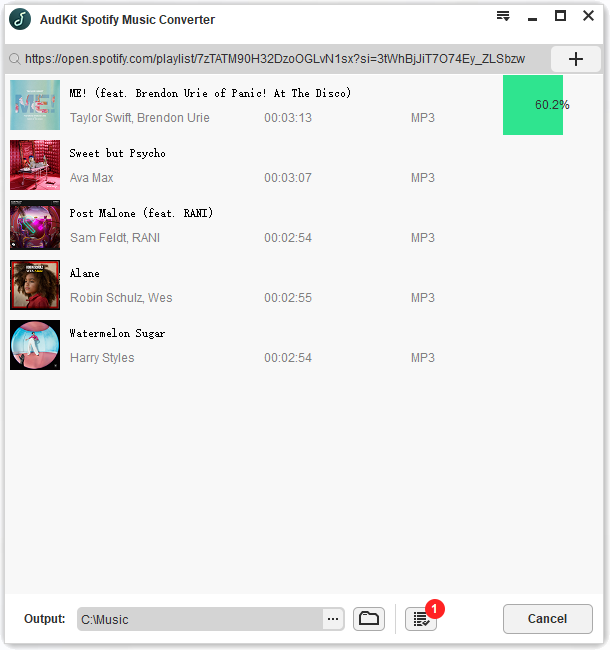
Confirm your settings once more and then click on the “Convert” button. Your music selection will eventually convert to the set output format and parameters. Once completed, locate them in the “Converted” folder of your computer’s local disk.
How to Add Music to Windows Movie Maker for Editing
Your Spotify playlists are now free from any restriction and you can easily import music from Spotify to Windows Movie Maker for your video editing steps.
Step 1. First, launch the Windows Movie Maker app on your computer.
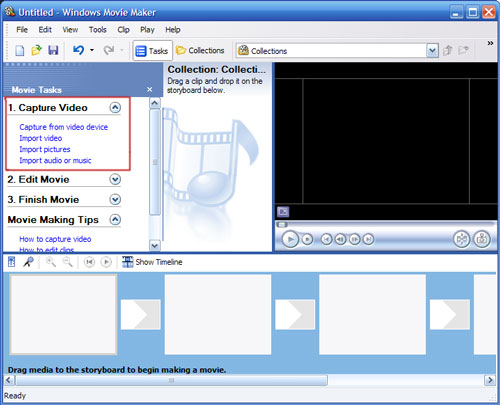
Step 2. Go to the “Capture Video” section and click on the “Import Video” button. Add a video that you want to edit to the Windows Movie Maker.
Step 3. Next, import the “Converted Spotify” music. To do this, click on the “Add Music” button to add music from your PC. Once you add Spotify music to video project, they’ll be placed as green bars beneath the video clip in the timeline.
Step 4. Lastly, edit the songs as you like then save your project. You can also share your video with friends on Facebook and YouTube.
Part 3. In Conclusion
Worries to move Spotify to Windows Movie Maker are resolved. You only require 3 steps with AudKit Converter to download Spotify playlist to MP3 for playing offline on Windows Movie Maker or other platforms. Move ahead and create memorable family videos from image captures and add Spotify music without further restrictions.

