I am an all-time Tidal fan, and I recently traveled to India, and seemingly I cannot find the Tidal app to download. Is Tidal available in India? How can I get it?
—— User from Tidal Community
With its extraordinary audio quality and extensive music library, Tidal is one of the most popular streaming services available. According to the Tidal website, you can access Tidal from 61 countries, including the United States, United Kingdom, Canada, Ireland, and more. But what about India? Can you use Tidal in India?
If you are an India-based audiophile who’s been dying to get your hands on Tidal, here we get the guide for you to access Tidal in India. You will find the 4 ways specific and easy. Step into this post.
Part 1. Is Tidal Available in India
Unfortunately, Tidal is not available in India. This is because the service has not been launched in the country yet. Spotify and Apple Music have rivaled Tidal in the past, but Tidal has always managed to find its niche, providing high-fidelity sound quality for audiophiles. We are talking about 4,608kbps FLAC files, which are lossless and uncompressed, meaning that you get to hear the music exactly as the artist intended.
Part 2. How to Use Tidal in India with VPN
The first way you can use Tidal in India is through a VPN. A Virtual Private Network (abbrev. VPN), is a service that allows you to establish a connection by changing your IP and then accessing geo-restricted content. This means you can connect to a server in a country where Tidal is available and use the service as if you were physically located there.
VPNs are easy to configure and use and offer various features that benefit users. For example, most VPNs encrypt your traffic, which protects your data from being intercepted by third parties. There are many different VPN providers available, but we recommend ExpressVPN as the best option for streaming Tidal. And this is how you use it to make Tidal possible to get.
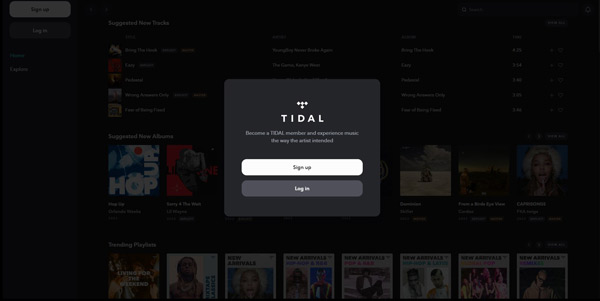
Step 1: Sign up for a VPN account. We recommend ExpressVPN as the best option for streaming Tidal.
Step 2: Download and install the VPN app on your device.
Step 3: Connect to a server in a country where Tidal is available, such as the United States.
Step 4: Visit the Tidal web player, or download and launch the Tidal app.
Step 5: Log in with your Tidal account credentials. You should now be able to access Tidal in India and stream your favorite tunes!
-
Pros
- Access to High-Quality Audio
- Bypass Geographical Restrictions
- Enhanced Privacy and Security
-
Cons
- Reliance on Third-Party Services
- Potential Speed and Stability Issues
- Limited Official Support
Part 3. How to Get Tidal in India via DNS
Another trick you can use to get Tidal in India is a DNS or Domain Name System. DNS is like a phonebook for the Internet that translates human-readable domain names into IP addresses. This means you can use a DNS service to access websites and services unavailable in your country. There are many different DNS providers available, and we take Unblock-Us as an example to illustrate how to use it for streaming Tidal in India.
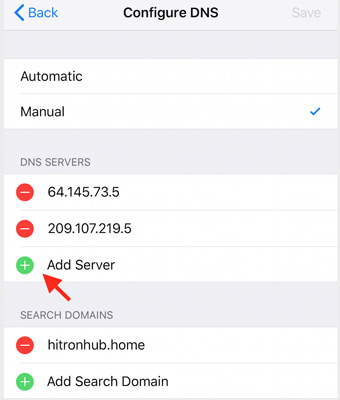
Step 1: Sign up for a DNS account.
Step 2: Set up the DNS service on your device. This will vary depending on your device, and you can search instructions from the website: https://support.unblock-us.com/hc/en-us.
Step 3: Once the DNS service is set up, go to the Tidal website and log in with your account credentials once you download the app. You should now be able to access Tidal in India!
-
Pros
- Offer Faster Access To Tidal
- Straightforward And User-Friendly
- Access to High-Quality Music
-
Cons
- Limited Security
- Restricted Access
Part 4. How to Play Tidal in India by Proxy Server
A proxy server is similar to a VPN in that it allows you to change your IP address and access geo-blocked content. However, proxies do not encrypt your traffic like VPNs do, which means they are not as private or secure. Proxies are also not as stable as VPNs, resulting in slower speeds and more buffering. If you decide to use a proxy to get Tidal in India, Here’s how to get Tidal in India using SOCKS5 proxies which are more secure and reliable than other types of proxies and offer better speeds.

Step 1: Find a SOCKS5 proxy service.
Step 2: Sign up for a proxy account with the service.
Step 3: Configure the proxy on your device. This will vary depending on the type of device and choice of proxy.
Step 4: Launch the Tidal app and log in to your account once the proxy is set up. You can now access and enjoy high-quality Tidal songs in India via a proxy.
-
Pros
- Access To Tidal In India
- Offers a Wide Range Of Tidal Music
-
Cons
- Application-Level Restriction
- Speed and Security Concerns
- Official Availability
Part 5. How to Use Tidal in India by AudKit
All the above-detailed methods are working perfectly to unblock Tidal in India. However, all require an internet connection, which is not always reliable in India. It’s convenient to download your favorite Tidal tracks and play them offline. If you have the plan to save Tidal songs for offline playback without any internet connection, here’s the best Tidal downloader for you: AudKit Tidizer Music Converter.
AudKit Tidal Music Converter is a powerful tool that can help you easily download and convert Tidal songs, playlists, and albums to MP3, FLAC, WAV, AAC, etc. With this tool, you can keep Tidal songs forever, even if Tidal is not available in your country. In addition, this Tidal converter offers the original quality of downloaded music files from Tidal and conversion at 5X faster speed. You can locate those Tidal music files with ID3 tags on your device and enjoy them offline without premium.
Main Features of AudKit Tidizer Music Converter
- Convert Tidal to MP3/AAC/WAV/FLAC and more
- Retain lossless quality and ID3 tags for Tidal HiFi and MQA music
- Save Tidal HiFi tracks to play offline without the Tidal app in India
- Start the Tidal downloading with 5X conversion speeds on Windows
Guide: How to AudKit to Download Tidal Music for Playing in India
Access the official website of AudKit Tidal Music Converter and then hit the “Download” button to get the program installed on your computer. Launch the program and register with the license code.
Step 1 Set output profile for Tidal tracks
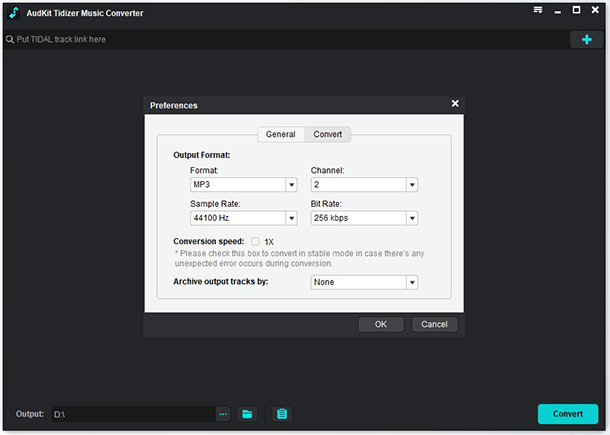
After downloading and installing AudKit Tidal Converter on your computer, launch it. Then go to the “Menu” > “Preferences” to set the output format, bitrate, conversion speed, etc. in the pop-up window. In the Output Format section, you can select MP3 as the standard audio format from the drop-down menu of Format. Besides, you can change the output quality by setting the bit rate, sample rate, and channel. Note that the conversion speed on Windows can be up to 5X, while 1X on Mac.
Step 2 Add Tidal songs to download
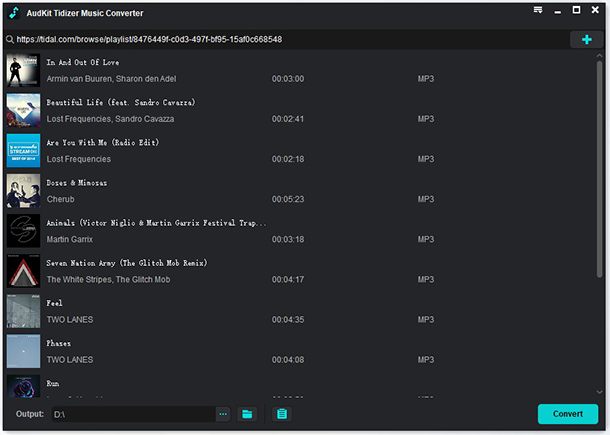
Now head to the Tidal app, log in to your Tidal account and find the Tidal songs or playlists you want to download. Then right-click and choose the Share option and select “Copy Song Link” or “Copy Playlist Link“. Return to the AudKit converter, paste the link you have copied into the pop-up window and click the “+” button. Or you can choose to drag & drop the target Tidal songs from Tidal to AudKit’s main interface.
Step 3 Start converting Tidal music offline
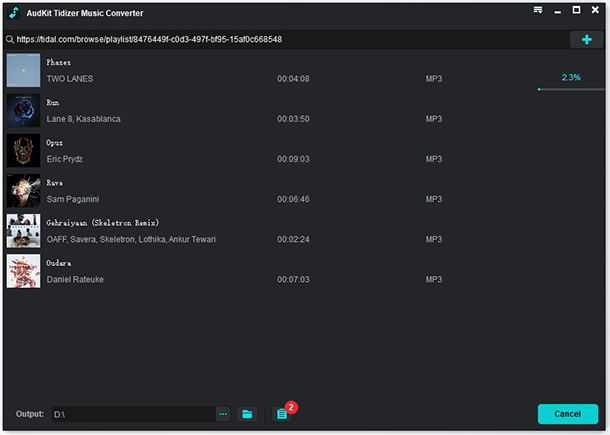
After adding Tidal songs, click the “Convert” button at the bottom right corner to start downloading Tidal HiFi music. Once finished, you will get the Tidal MP3 format files under the Converted icon. And then you can play Tidal songs offline in India without any internet connection.
Part 6. Conclusion
Tidal is an excellent music streaming service with high-quality soundtracks. However, it is not available in all countries, including India. Why Tidal is not available in India? That’s because Tidal hasn’t officially been launched in India. If you want to use Tidal in India, we have listed 4 viable methods in this guide to help you.
Since there is no upcoming news about Tidal in India, it’s advised to get what you want from Tidal backup on your device. AudKit Tidal Music Converter will let you download and store Tidal songs offline so that you can listen to them anywhere without modifying your IP address. If you have any questions about this post, please let us know in the comments below.
Windows:
macOS:

