

Among the popular music streaming services is Tidal. The app continues to ride an uplifting wave of music momentum since it was launched in early 2015. It was barely two years later that Tidal introduced the hi-res audio streaming service. This was made possible by the MQA technology. But users still search for ways to get Tidal multiple devices.
It doesn’t end there! Tidal also works on multiple devices. You may be burning to know how many devices can Tidal authorize simultaneously. Well, Tidal can use up to 6 devices online.
When you enable Offline Mode, Tidal allows you to play pre-selected music without streaming. Just use a media player device and enjoy your music. However, you can only use one device at a time in offline circumstances.
In this tutorial, we’d like to introduce 3 ways to help you offline listen to Tidal on multiple devices, even more than 6 devices.
Part 1. How to Use Tidal on 2 Devices Simultaneously
With Tidal single account, you can listen to more than one device. However, one device can be online while the other has to be in offline mode. Follow these steps to get Tidal music on 2 devices simultaneously.
Step 1. Launch the Tidal app on your device and log into your Tidal account.
Step 2. Then peruse the Tidal songs that you wish to listen to. You can add them to the playlist.
Step 3. Next, go to the ‘My Collection’ category > ‘Playlists’.
Step 4. Check for the Tidal playlist you had just created and enable the ‘Download’ feature. The playlist will then be downloaded to your device.
Step 5. Wait for the download process to be completed. Then head to the ‘My Collection’ screen and choose the ‘Settings’ option. Next, activate the ‘Offline Mode’ by toggling the Offline button to ‘ON’.
Step 6. Hurray! Now listen to tidal music simultaneously on online and offline mode devices. Please note that the Tidal single account will only accommodate one online device and one offline device.
Part 2. How to Use Tidal on 3 Devices Simultaneously
Many users wonder how many devices can Tidal use with the Family account. Well, you can use up to 3 devices on the Family Plan for Tidal multiple devices. This plan also comes with added pros like viewing adding and managing members. To add members, just select the ’Add Family Member’ option and submit an email address for them. They will then get a notification email regarding their account creation and the ability to sign in. Let’s see how to add your family members to the plan.
- Go to the ‘Tidal official website’ and log in to your Tidal Premium or HiFi Family account.
- Next, head to the ‘Edit your Family Subscription’ tab and choose the ‘Add family member’ option.
- Key in the email address of that family member. They should now wait for Tidal to send a confirmation email informing them that the family account creation is successful and complete.
Remember, you can add up to 5 family members who will play offline. However, only 3 members can play at the same time. Follow these steps to use Tidal on 3 devices simultaneously and save the search for how many devices on Tidal can you use.
Step 1. Launch Tidal app on your computer, then click the ‘Account’ option. Next, choose the ‘Manage Subscription’ option. This will redirect you to the ‘Tidal plan’.
Step 2. Now choose the ‘Tidal Family’ plan which is either Premium or Hi-Fi. Confirm your action.
Step 3. Up to 3 members can now enjoy Tidal music at the same time.
Part 3. How to Play Tidal on Unlimited Devices Simultaneously
SinceThe Family Plan is an effective way of playing Tidal on multiple devices. However, it limits you to playing on 3 devices simultaneously. Likewise, the price may be a hindrance to some users. That’s why we bring you the best option to use Tidal on multiple devices.
To curb this problem, please take a look at this vital tool for your Tidal download to SD cards, AudKit Tidizer Music Converter. works smartly to losslessly convert your Tidal music for offline listening. It carefully converts Tidal to MP3, WAV, FLAC, AAC, among other formats.
The speed is also high. It has a built-in high-speed processor that converts your music into batches. You just need two hours to convert a 10-hour Tidal playlist. Likewise, you can easily move the converted music and play them on multiple devices without limits.
Main Features of AudKit Tidizer Music Converter
- Convert Tidal to FLAC, MP3, WAV, etc.
- Retains lossless quality of Tidal music
- Transfer Tidal download to multiple devices
- Retain ID3 tags like the album, artists, etc.
How to use AudKit Tidizer Music Converter
AudKit Tidizer Music Converter offers a free trial for you to explore its usability. It also gives you 3 kinds of plans that you can opt for later on.
First, download and install AudKit Tidizer Music Converter on your computer. Once you launch the app, the built-in Tidal tool will show up. Then go to the ‘Menu’ option and click the ‘Register’ tab to unlock Tidal features.
Next, copy and paste the licensed email and registration code to activate the app’s full version.
Step 1 Reset the output profiles
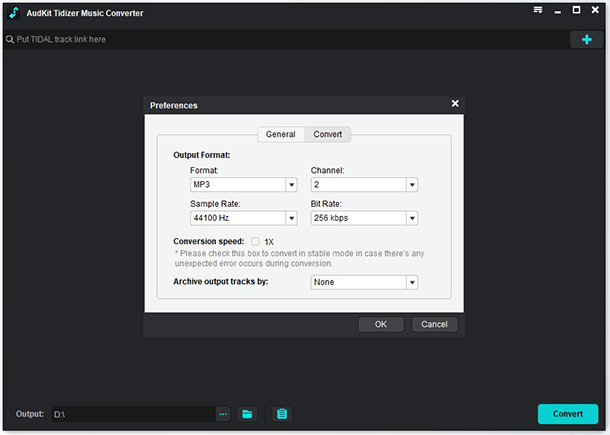
Start the download and conversion by hitting the ‘Menu’ icon and then choose the ‘Preferences’ > ‘Conversion’ option. Next, customize the output format, sample rate, bit rate, and channel.
Step 2 Import Tidal tracks
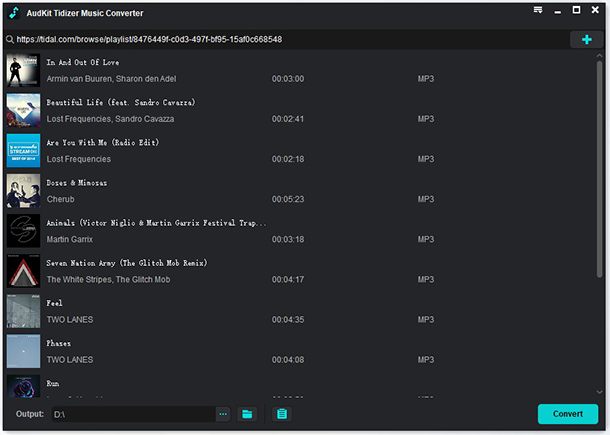
Next, open a Tidal playlist from the built-in Tidal app. The ‘Add Music’ button will glitter on the lower-right corner. Just click on it and select a playlist or a single song from the playlist.
Step 3 Download and convert Tidal playlists
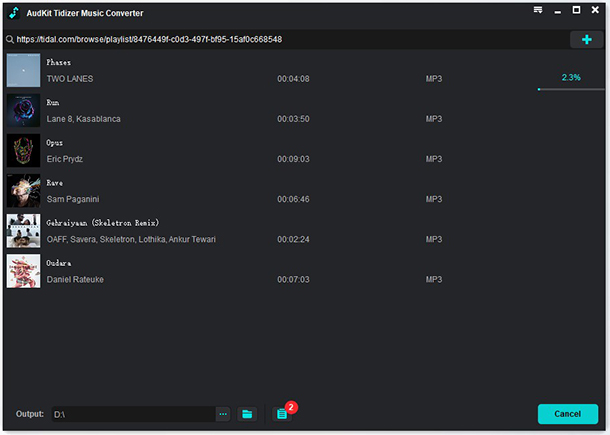
Finally, click on the ‘Convert’ button and let AudKit Tidizer start the conversion process. You can add more songs to the list during the conversion process. You will see a red tip on the ‘Converted’ icon when the projects for conversion are completed. Open the icon and locate the converted Tidal playlists.
You can also use the ‘Search’ icon to access the local output folder where your converted Tidal playlists are saved. Your Tidal playlist has just been downloaded and converted from Tidal onto your computer. Import them to Tidal multiple devices for listening.
Step 4 Import converted Tidal tracks to multiple devices
Once successfully converted, you can now use Tidal on multiple devices.
- Head to the ‘Storage location’ on your computer and check for the converted playlists.
- Next, connect your device to the computer via a USB cable.
- Start transferring the converted Tidal playlists to the device. Remember, the number of devices you can get the playlists on is unlimited.
- Finally, start playing Tidal playlists on your devices regardless of how many devices on Tidal underuse.
Part 4. Conclusion
Perhaps you were wondering how many devices on Tidal can you use. Well, you can play on 2 devices simultaneously with the Tidal single account and 3 devices with the Family Plan. Nonetheless, you can get Tidal on unlimited devices with the help of the AudKit Tidizer Music Converter. It works in simple steps and will give you lossless quality music with original quality.

Elle Johnson
Elle Johnson has been working in the technology and music software field for over 5 years. She is dedicated to providing easy-to-use guides and effective tips to play music anywhere.
2 replies on “Tidal Multiple Devices – Authorize Tidal to Multiple Devices”
I have several questions. 1) can I change my email address from what’s on file and keep everything on Tidal the same. 2) i have a work cell with a separate email that I want to set up. Can I have 2 accounts under 1 billing account. Please advise. Thanks
Hey Michael, you can register Tidal account with different email addresses and use two accounts under the same device. But you can’t use them at the same time.